Wonders Stripped of Protections in Grand Staircase Escalante National Monument
When designated in 1996, Grand Staircase Escalante National Monument, stretching over 2938 square miles of Southern Utah from Bryce Canyon National Park to Capitol Reef National Park, was by far the largest national monument in the contiguous United States. Everything, including protected lands, is bigger in Alaska, but only Misty Fjords National Monument (3584 square miles), part of a quartet of national monuments established in Alaska in 1978, was larger. In the contiguous United States, the next largest national monuments had a size one order of magnitude smaller. They were Organ Pipe Cactus National Monument (517 square miles), Dinosaur National Monument (328 square miles), and White Sands National Monument (224 square miles). Those are respectable sizes even for a national park. In fact, when White Sands National Monument becomes White Sands National Park, likely next week, it will be the 35th largest national park, between Zion National Park (229 square miles) and Redwood National Park (176 square miles).
Grand Staircase Escalante National Monument had also the distinction of being the first national monument managed by the Bureau of Land Management (BLM). Unlike the National Park Service, whose mandate is preservation and compatible recreational uses, BLM properties are multi-use, which means that without additional protections, pretty much anything goes: logging, drilling, mining, cattle grazing, off-road driving, you name it. As a national monument, many of those activities were restricted, but someone wanted them authorized again. Concluding an unprecedented “review” in 2017, President Trump ordered the monument’s size to be reduced almost by half, to 1568 square miles. At first, it may look like Grand Staircase Escalante National Monument started a new trend of huge, BLM-managed, national monuments that justified that “review”, but the Antiquities Act had been used in the early 20th century to designate large areas such as the Grand Canyon (1,902 square miles) or Death Valley (5,269 square miles) that subsequently became national parks.
The lands excluded from the monument remain federal lands under BLM jurisdiction, but they lose the protections provided by the national monument designation. Although the president’s authority to shrink a national monument is unclear, and as a consequence several lawsuits are pending, the BLM has issued forth with a new management plan that prioritizes resource extraction over the protection of natural resources. As suggested by the monument’s size, those resources are tremendous. The monument provides a nearly complete snapshot of the Late Cretaceous Period, from about 95 million years ago to the extinction of the Dinosaurs. The Kaiparowits Plateau, at the center of the monument, has been the scene of many discoveries in paleontology with more than 20 new species of dinosaurs found there.
However, there is no need to be a scientist to appreciate the value of the land. First, its space and wildness. The area is the last region in the contiguous United States to have been mapped. Before the 1870s, maps of the area just indicated a blank space. The Escalante is the last river in the contiguious U.S. to receive a name, and the Henry Mountains are its mountain range last named. Then, there is the diversity of the terrain, forming some of the country’s best slickrock areas. Every possible type of geological wonder that you can think of is there: canyons large and small, badlands, hoodoos, caprocks, natural arches. Moreover, those count amongst the most remarkable of their kind that I have encountered, making them true natural wonders. It is no surprise that many name Grand Staircase Escalante as their favorite national monument. In the rest of this article, I illustrate that point by taking you on a quick tour of some of the areas to possibly lose the national monument protection.
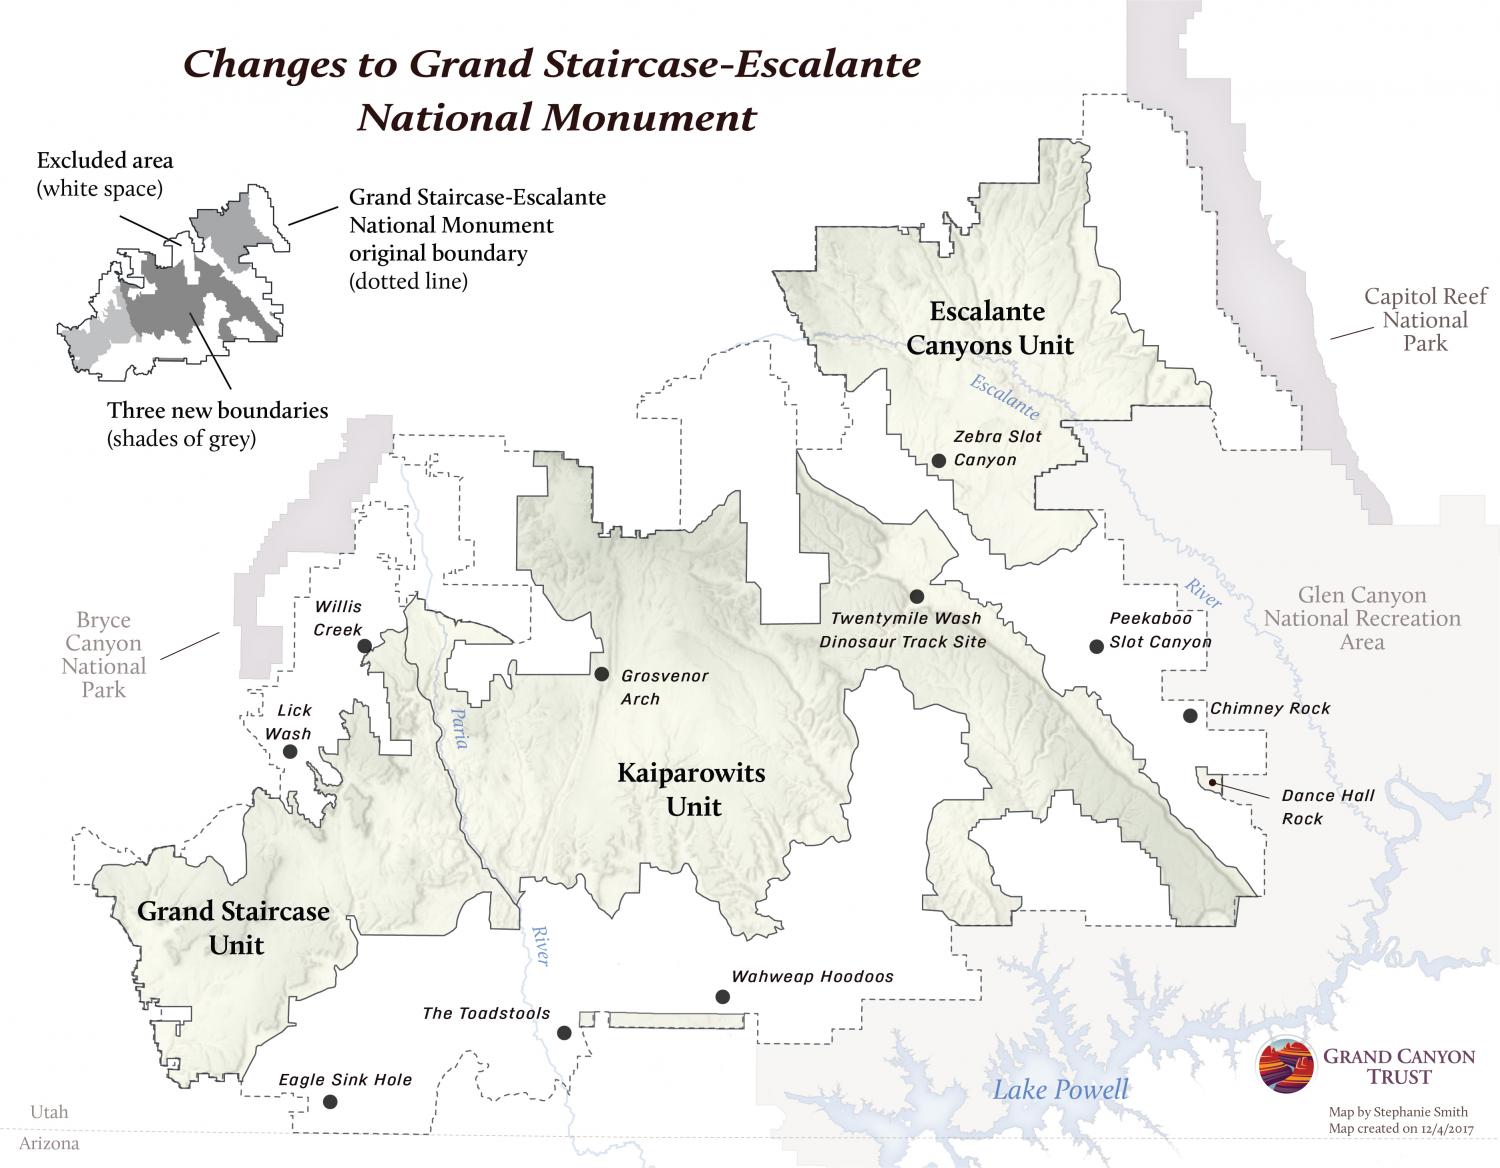
Map by Stephanie Smith,
Grand Canyon Trust, reproduced with permission. Despite their name, the Grand Canyon Trust has been very active in advocating for the national monuments under attack. Visit their Grand Staircase-Escalante page for information and frequent updates.
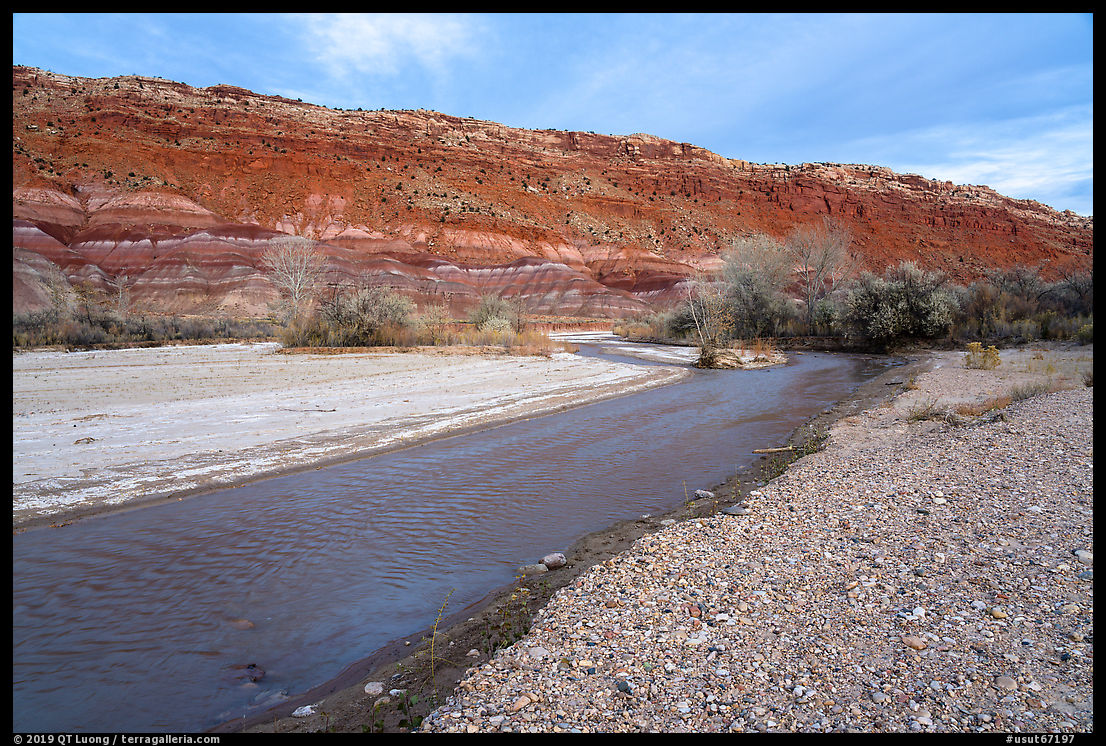
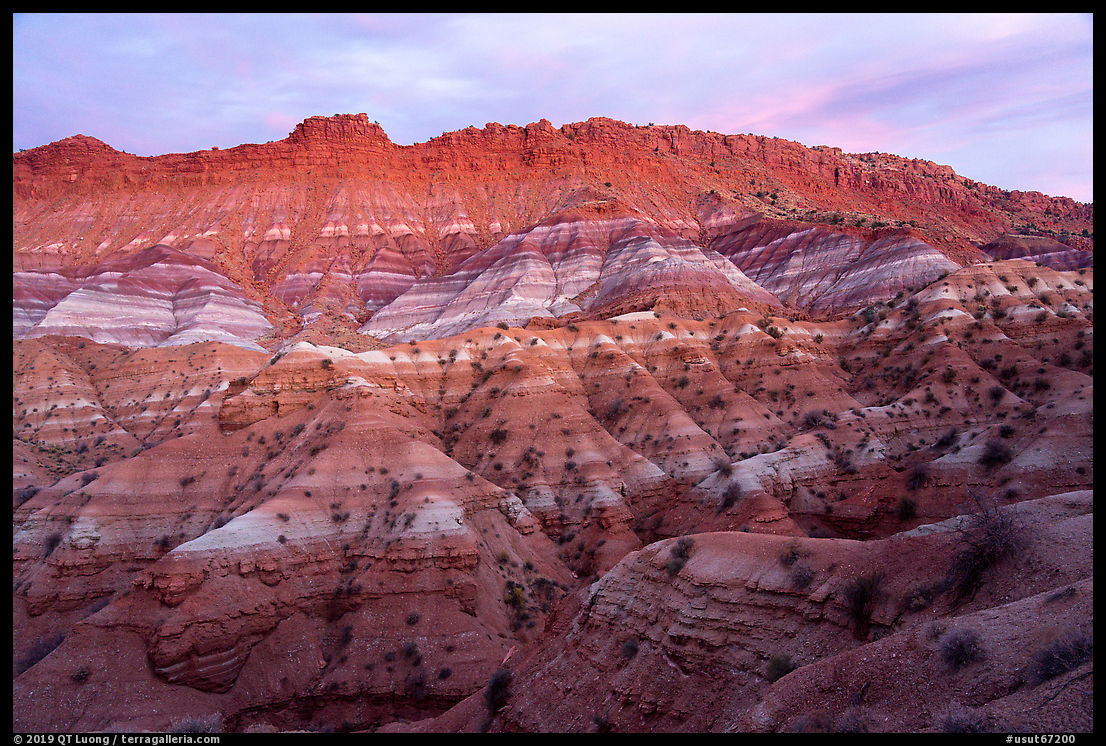
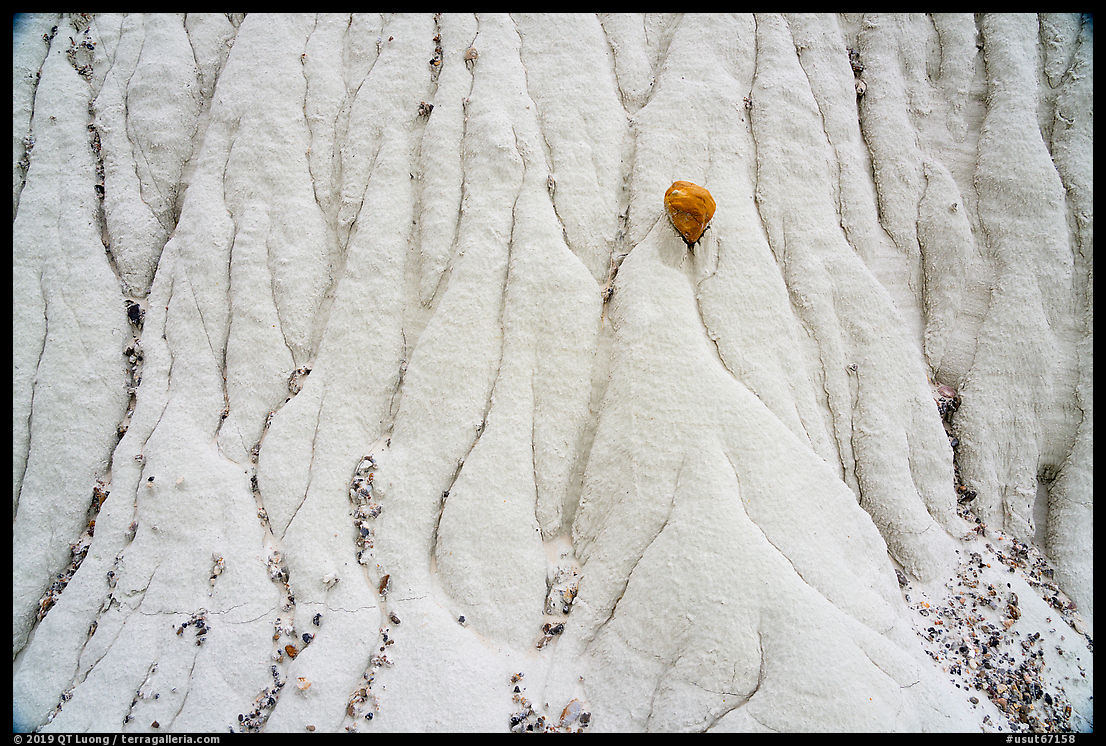
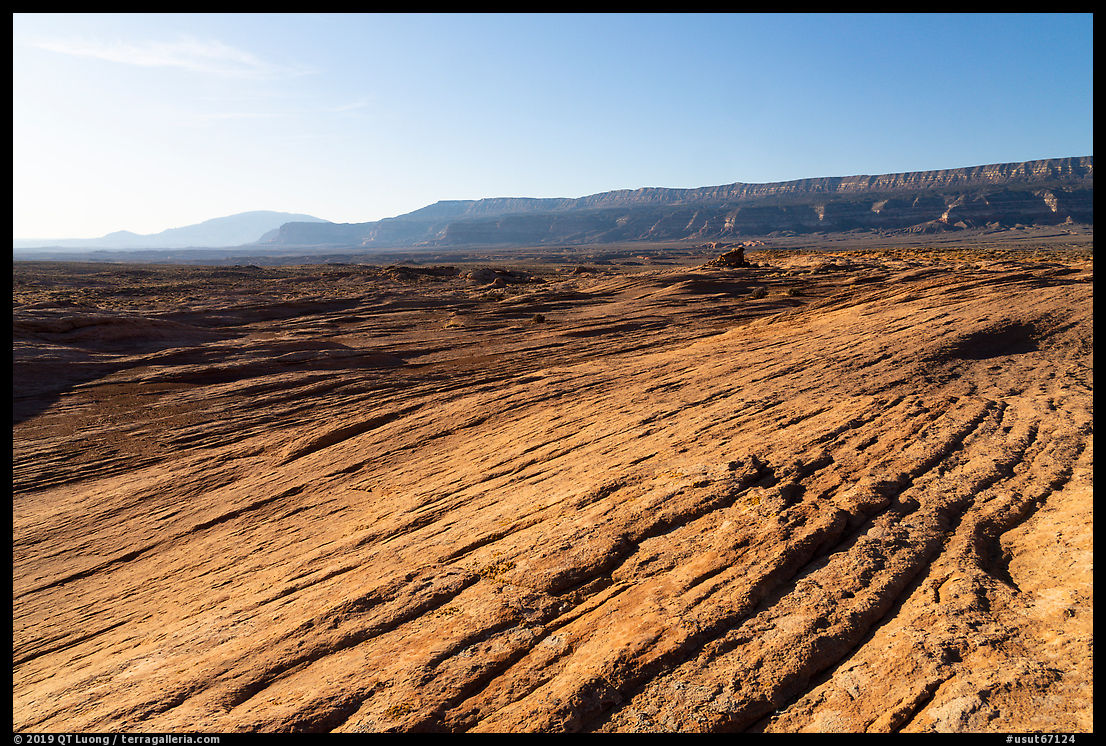
Paria Badlands
There are many areas of badlands in the southwest, but the Paria Badlands are the most colorful I have seen. They can be seen along the Old Paria Road off US 89. Although unpaved and rough in places, the road is passable by regular cars driven carefully. Fifteen minutes after sunset, the colors became surreally intense.
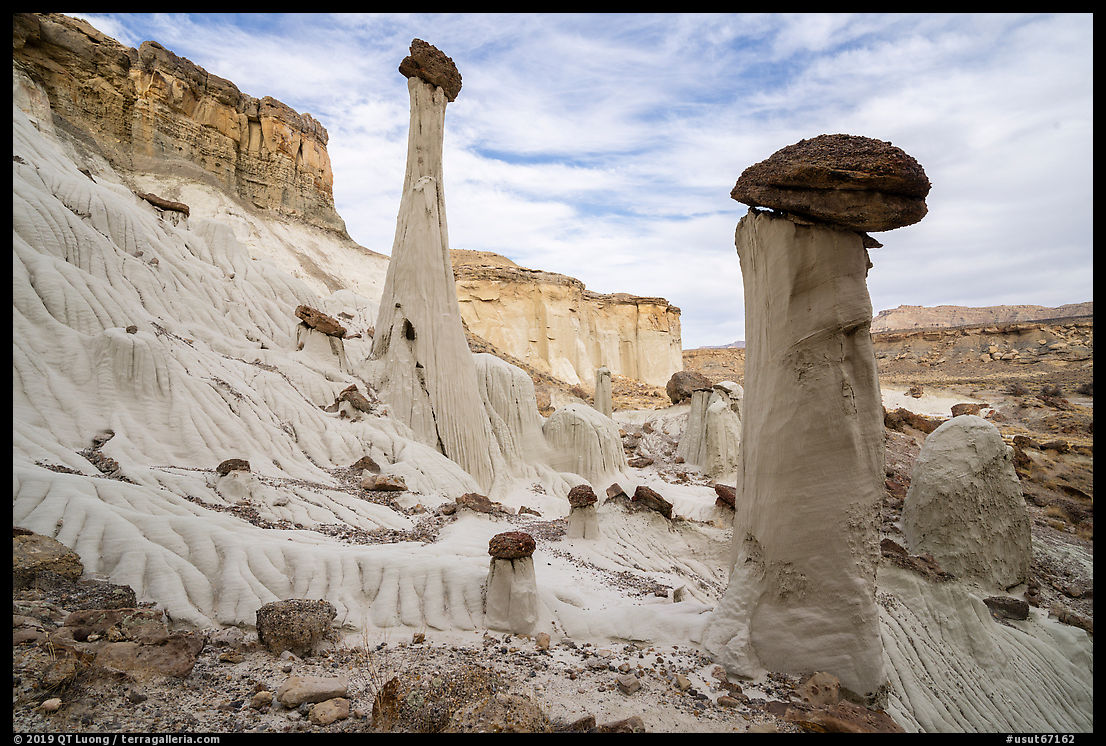
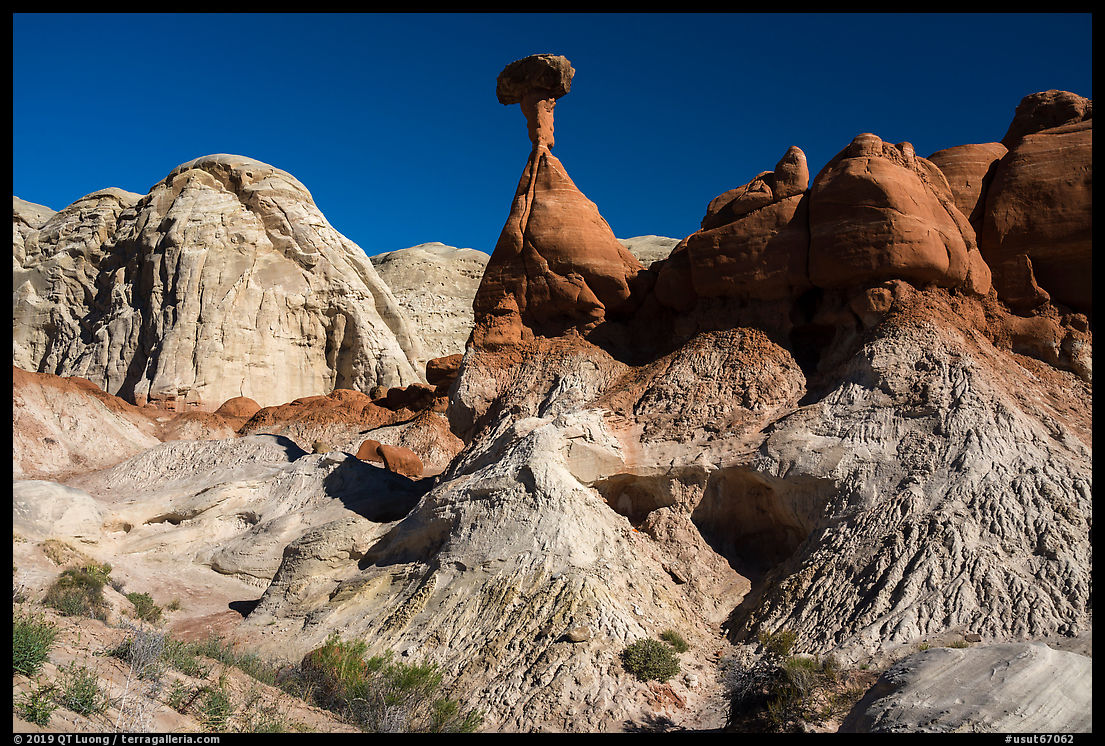
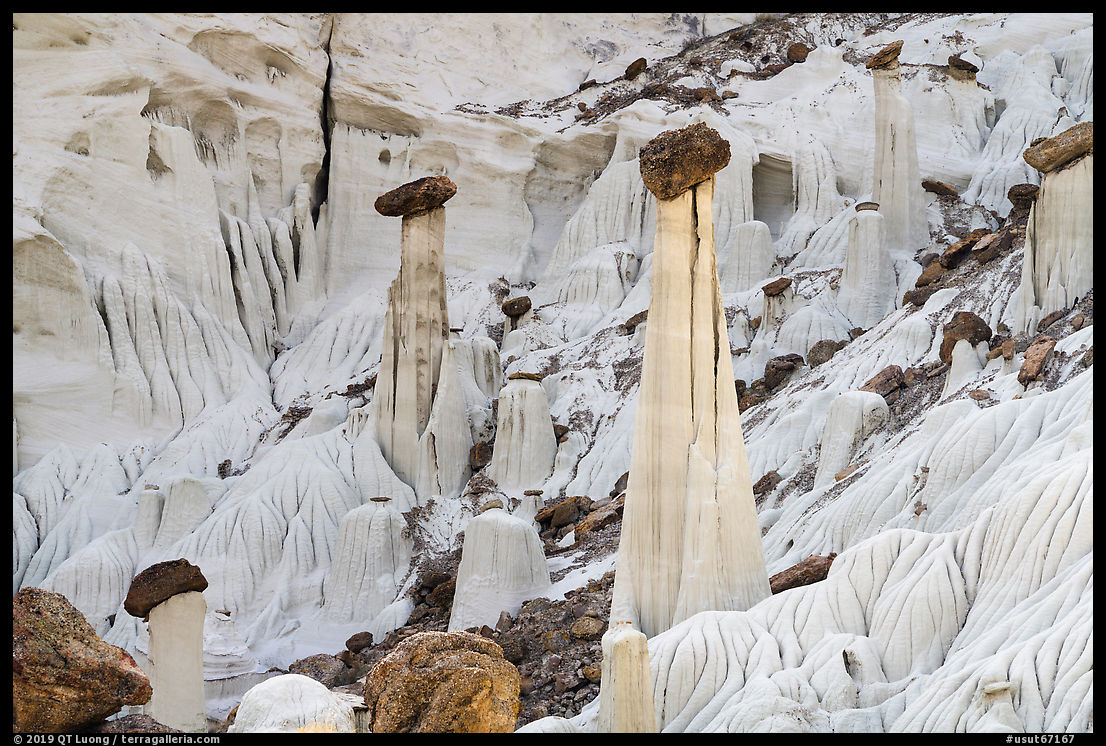
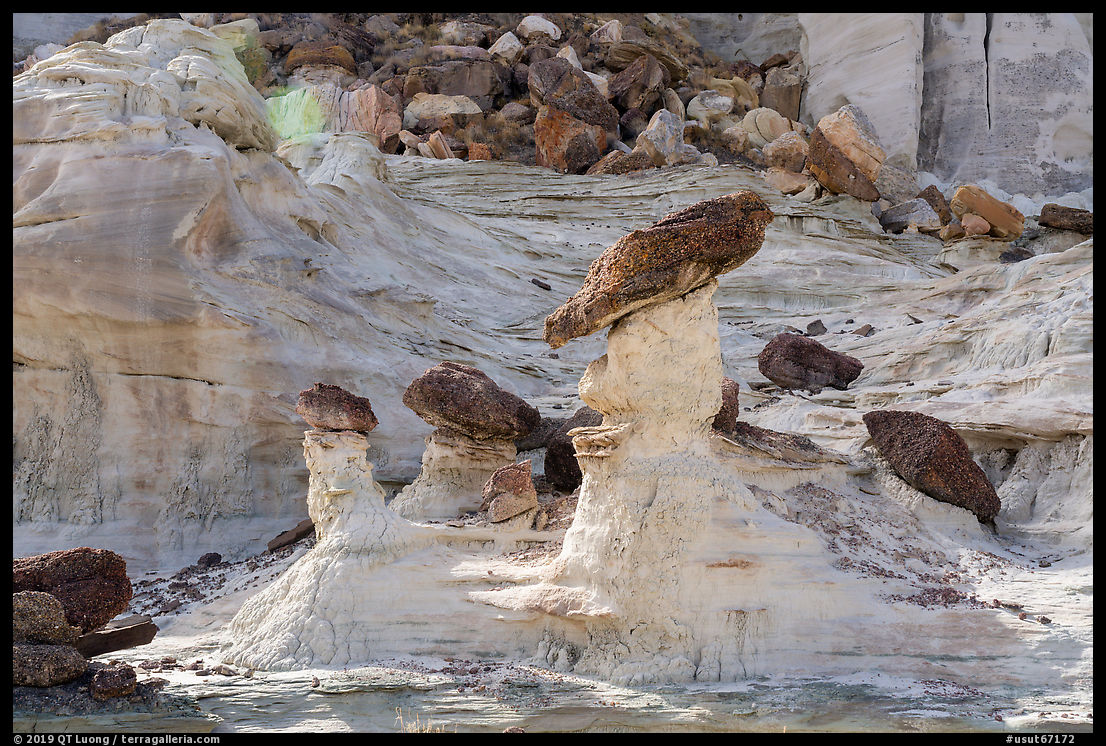
Paria Toadstools
Given its size and wildness, many of the attractions in Grand Staircase Escalante National Monument are quite remote, however, the Paria Toadstools are very easy to access. No driving on unpaved roads is required, as the trailhead is just off US 89 between Kanab and Page, and it is only about half a mile along a wash to the impressive sandstone spires supporting massive boulders on their heads.

Wahweap Hoodoos
The formations first named by Michael Fatali “Towers of Silence”, display a particular elegance thanks to their slander white spires. However, the Wahweap Hoodoos offer more to explore, including pedestal rocks of diverse shapes and beautifully textured badlands. Although hiking in the dark to get there at sunrise felt a bit of a slog, the 9 miles round-trip off-trail hike is easier than it sounds, as it takes place entirely along a flat and wide dry wash. There was no light at sunrise, but that did not diminish the appeal of this special place.
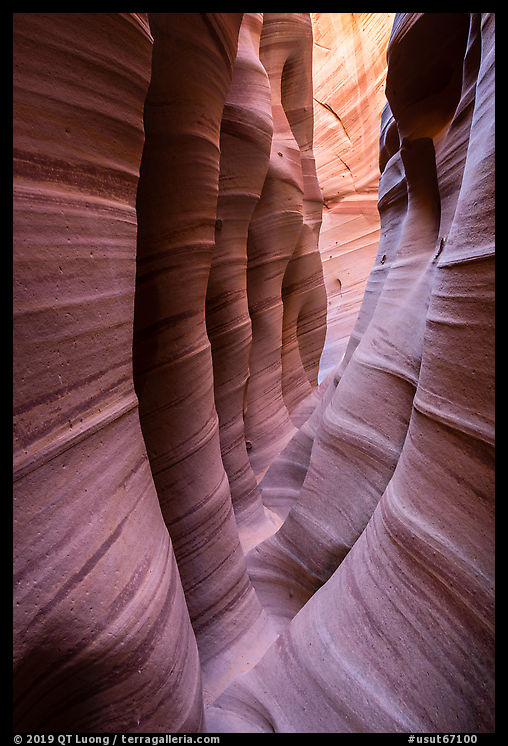
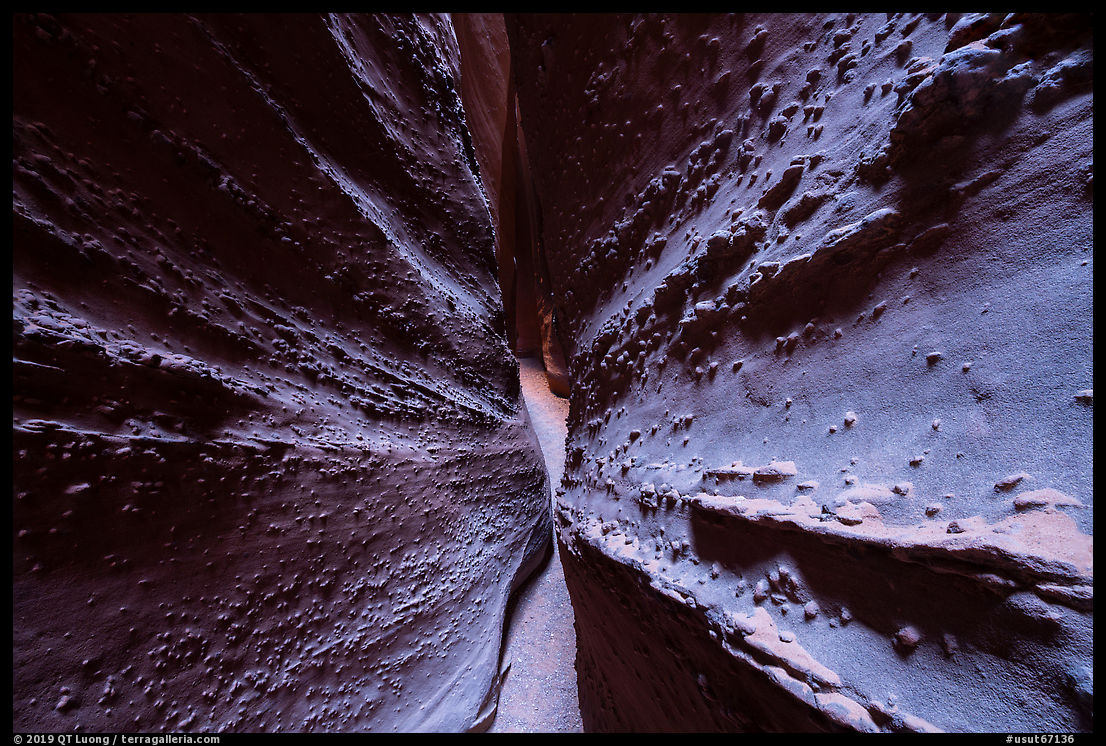
Zebra Slot Canyon
With its pillars, encrusted moqui stones, and multicolored striations that inspired its name, Zebra is one of the most unique slot canyons I have seen. While the canyon itself would still be within the new Grand Staircase Escalante National Monument boundaries, its access trail (5 miles round-trip from a trailhead along the unpaved Hole-in-the-Rock road) would be completely outside. The canyon was so narrow that I could not squeeze in with my camera backpack. After awkward maneuvers such as holding my pack above my head or chimneying the slippery and steep walls, I eventually left the pack in a corner, heading out with only a camera and tripod. The later was necessary because focus-stacking (blending several frames focussed at a different distance) was the only way to get enough depth of field with the unforgiving 60MP sensor of my camera, even f22 was not enough.
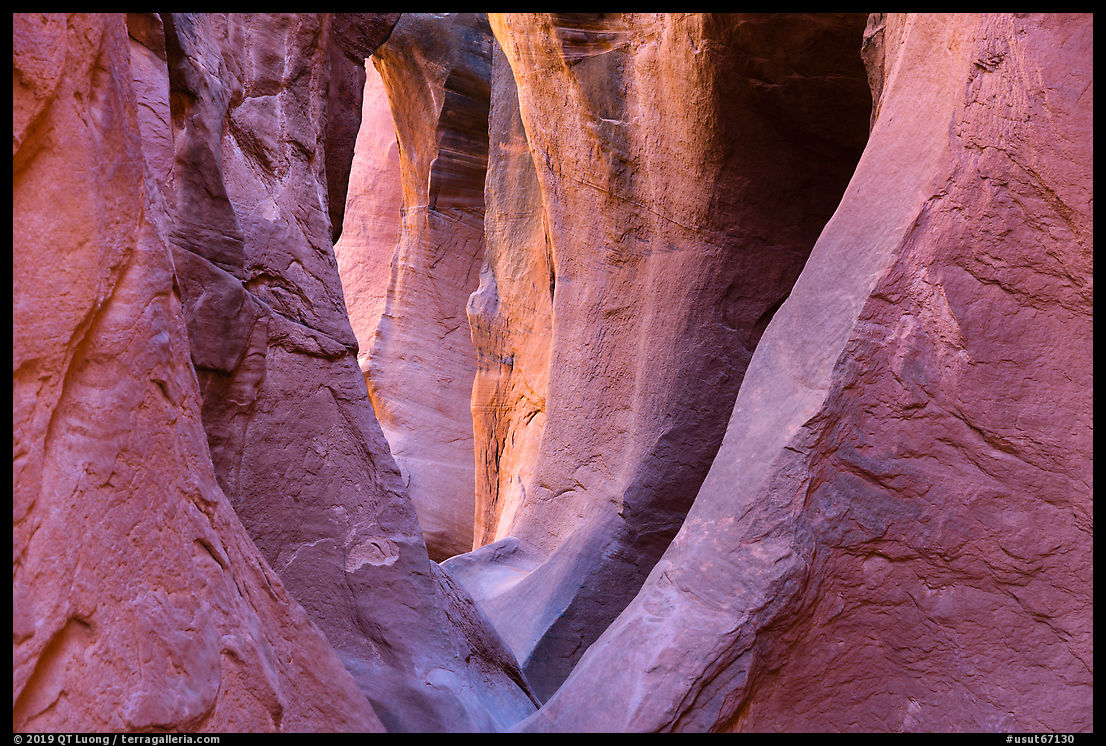
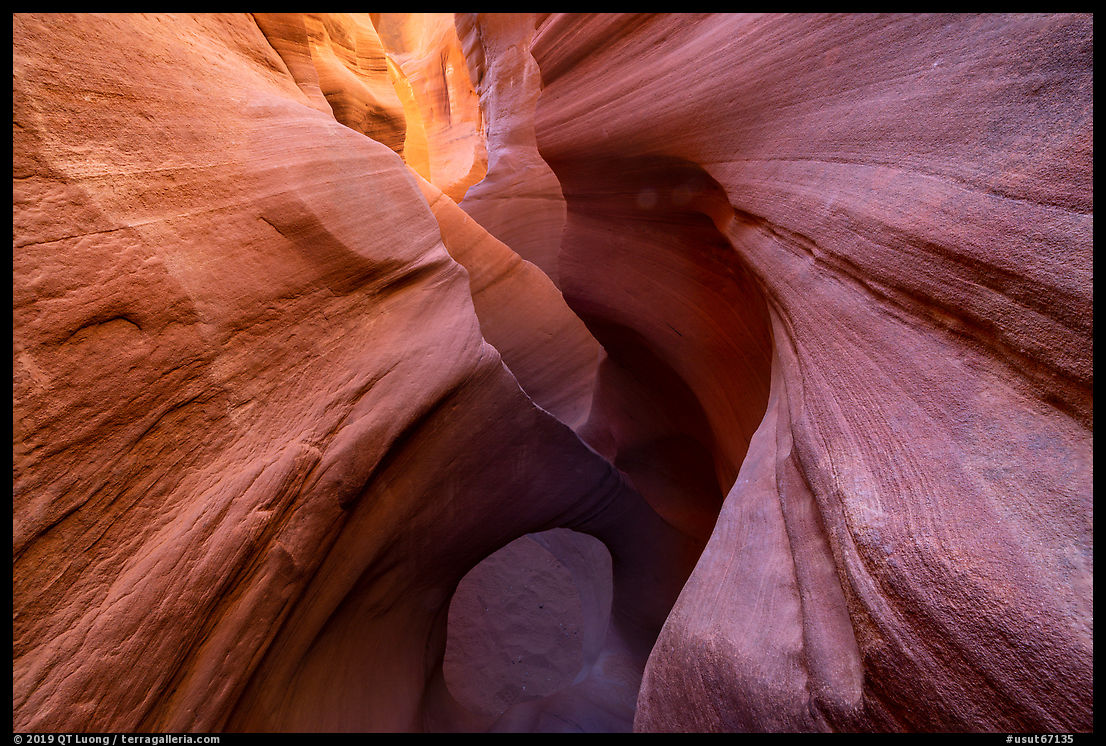
Dry Fork Coyote Gulch
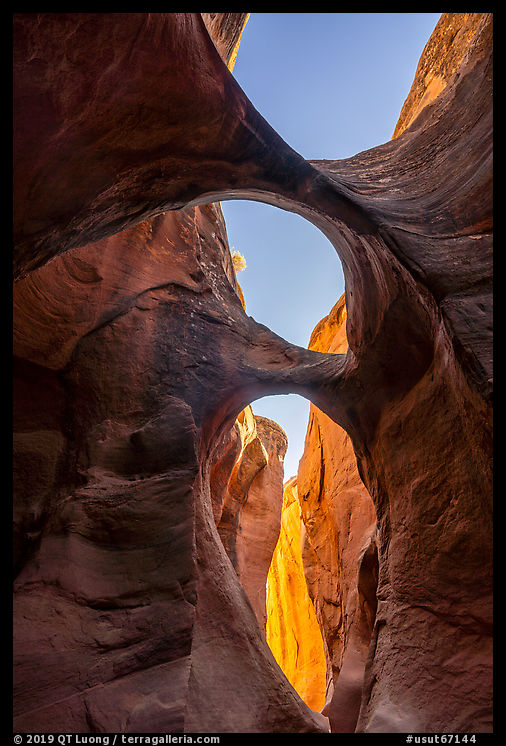
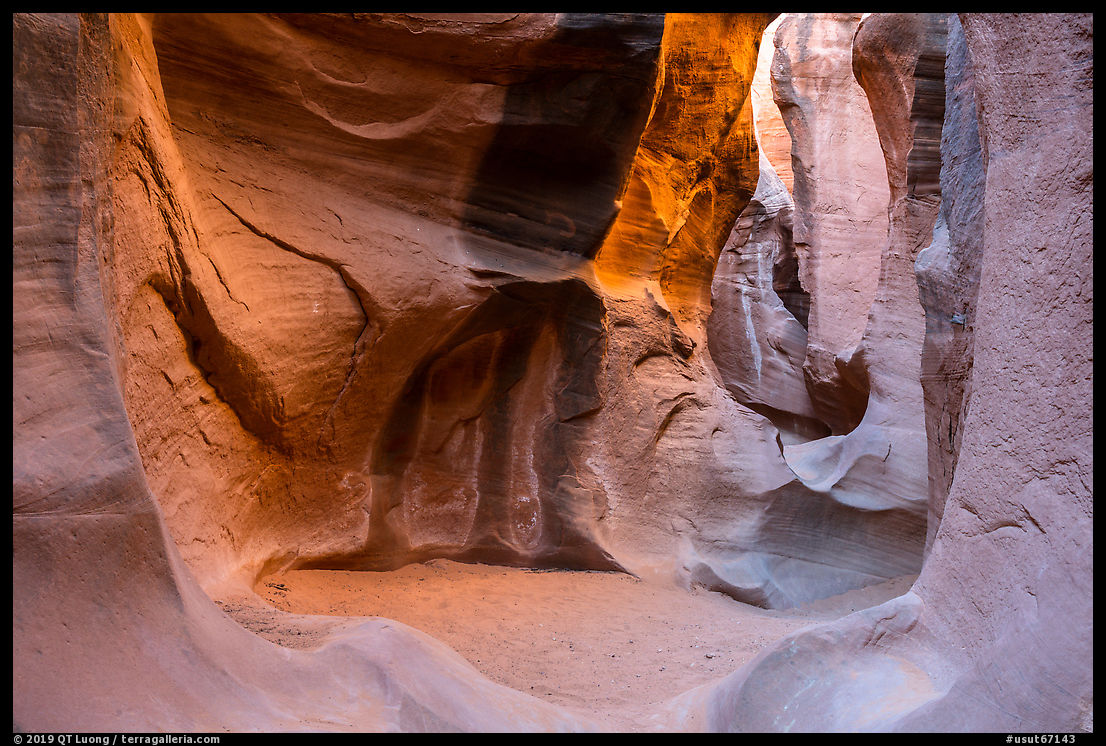
Many consider Coyote Gulch to be one of the finest desert hikes in the world. The lower part of Coyote Gulch is located in the NPS-managed Glen Canyon National Recreation Area, however the upper part of the Gulch is part of the areas of Grand Staircase Escalante National Monument to lose protections. The Dry Fork of Dry Fork Coyote Gulch includes 4 beautiful slot canyons: Dry Fork Narrows, Peek-A-Boo, Spooky, and Brimstone. Peek-A-Boo is distinguished by a number of arches. The largest are close to the entrance. When I arrived in the late morning, the sunlight was already reaching the top of an arch, creating a bright spot there. However, the reflected light created a beautiful glow at the bottom of the arches, which is what I framed in my composition looking upstream. Moving further up the canyon, I found a tiny arch that added interest to a beautifully sculptured section. Returning in the mid-afternoon, sunlight didn’t reach any more into the canyon. Looking upstream, there was not enough reflected light to separate the arches, but looking downstream the contrast created by reflected light, shade, and sky worked well to that effect. While other canyons are narrow at the bottom but open up at the top, many sections of Spooky had tall narrow walls, and as a result, even at midday, it was very dark. That, combined with the knoby texture of its walls made it truly deserving of its name!
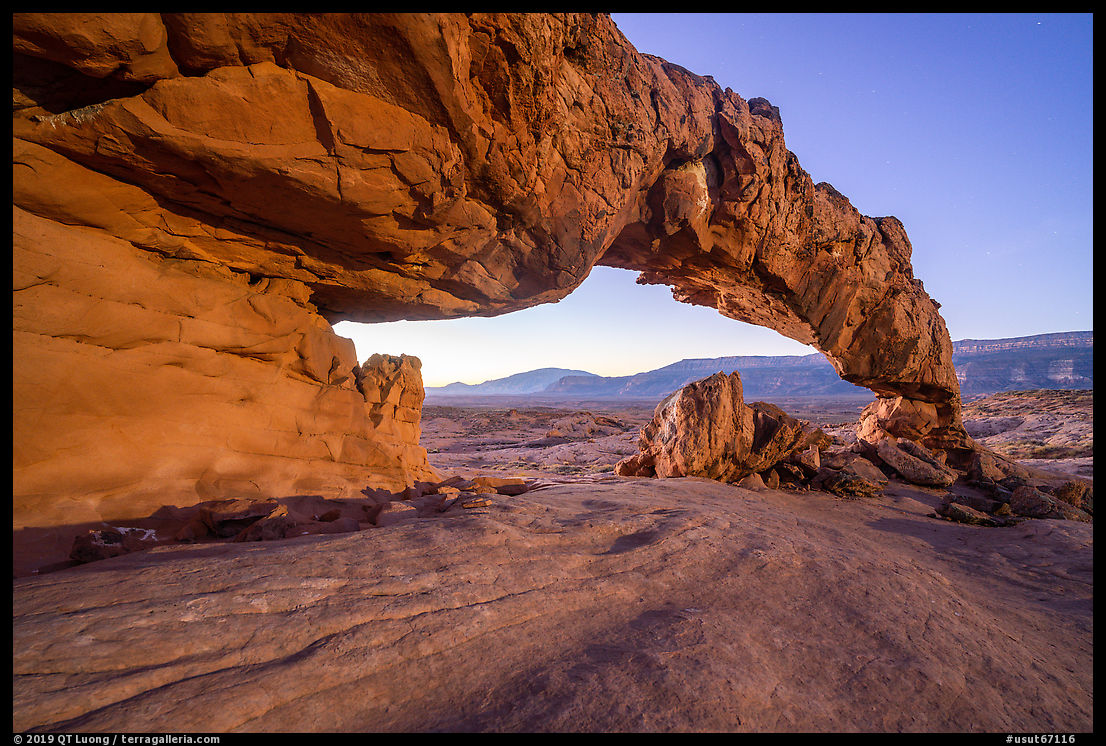
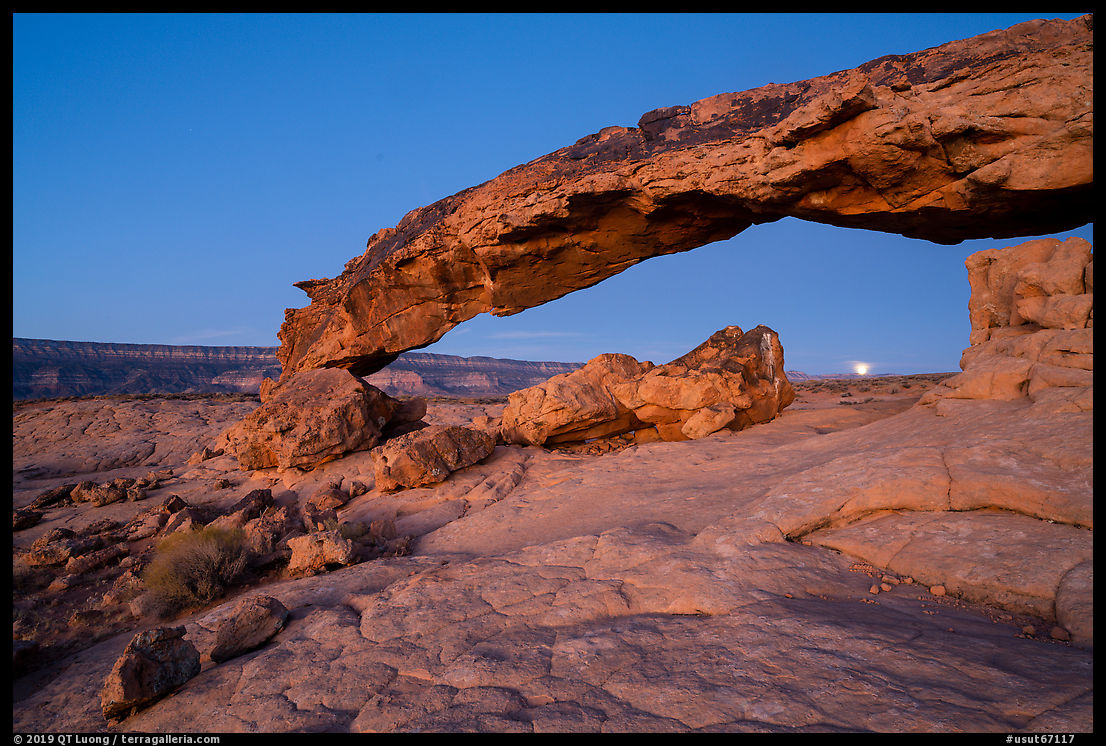
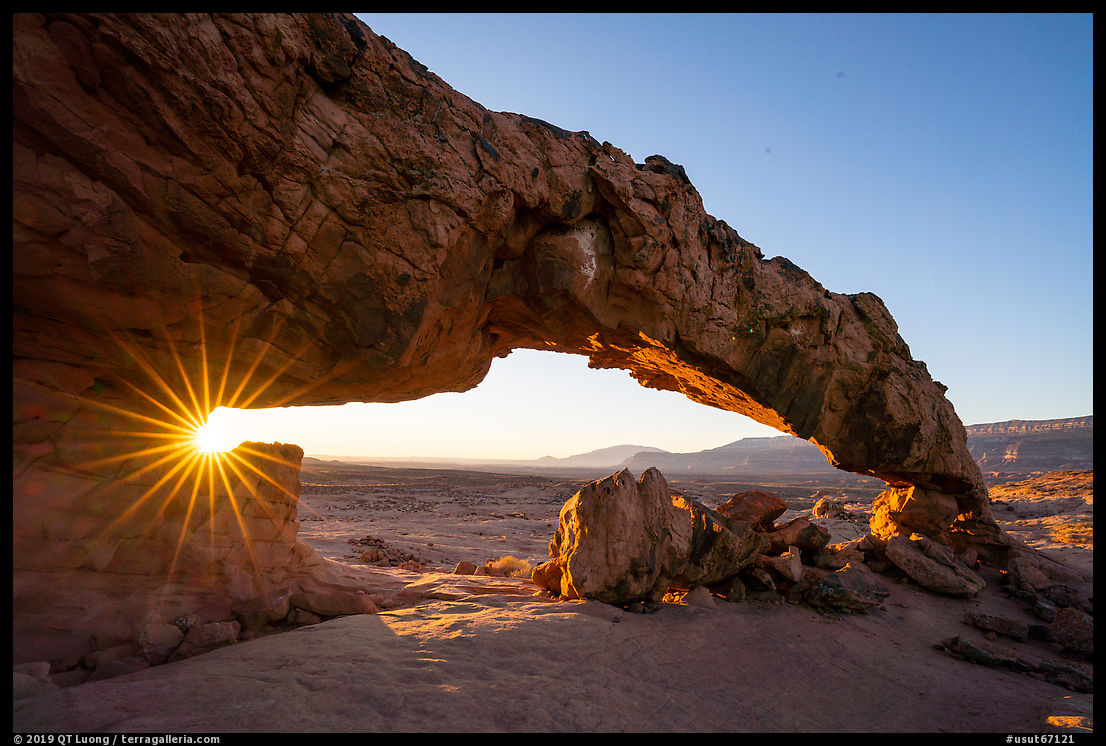
Forty-mile Ridge
I got up two hours before sunrise, planning to visit Sunset Arch for moonset, which on that day happened less than one hour before sunrise. I was hoping for the arch to be illuminated by the setting moon, which projects a soft, warm light like a sunset (although the eye cannot see its color well), as the eastern horizon would be colored by the pre-dawn light. However, hiking in the dark, I began questioning my directions when after half an hour of cross-country hiking, I did not see anything other than featureless sandy terrain. How could such a distinctive arch rise out of this featureless and unremarkable landscape? Eventually, the sand gave way to sandstone slabs, but the arch itself did not come into view until I turned a corner and reached its span. By then, I was late by maybe ten minutes, and the sky was already too bright compared to the moonlight. Instead, I pulled out a bright LCD light panel that I used to add a bit of glow to the western side of the arch, as a substitute for moonlight. After photographing the moonset and sunrise through the arch, it is only when I looked back at the arch from a distance that I realized that even finding it in the dark was not a given.
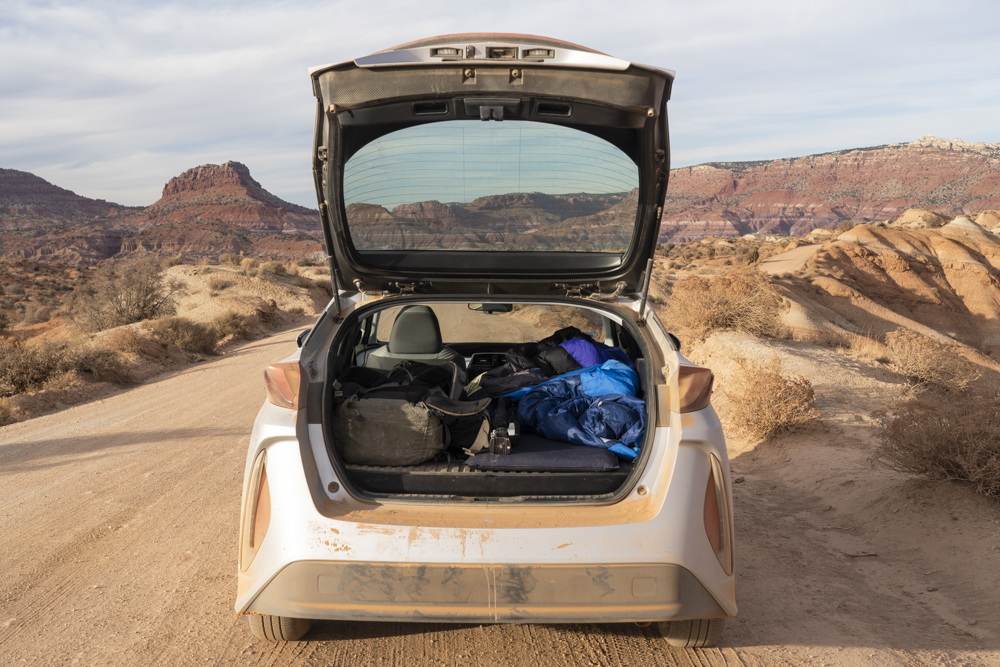
The day before, after 40 miles of dirt road driving on Hole-in-the-Rock road, I had parked at the Forty Mile water tank for the night. With the reduction in size of the Grand Staircase Escalante National Monument leaving the entire road of out it, there are plans to pave it to promote large vehicle travel. That I was able to make it there with my Prius demonstrates that keeping the remote and wild character of this place intact by not paving the road would not prevent determined fellows to visit, even with the flimsiest of vehicles.
More images from Grand Staircase Escalante National Monument