I have seen quite a bit of confusion about how many national parks there are in America, and what distinguishes them from other public lands, including state parks, national forests, wildlife refuges, and other units managed by the National Park Service. In this article, I break down the names of the public lands and examine the significance of the designation for the 59 national parks.
The national parks and other public lands
The
Yosemite Grant (1864) marked the first time a nation had set aside a large tract of pristine land for all people and for all time. Even though the notion of public land and its preservation dates back further, the national parks would be their first tangible embodiment. Yosemite was initially administered by the state of California and became a national park in 1890. Yellowstone (1872) happened to be the first
national park because at that time, Wyoming was a territory and not a state, so Wyoming could not administer Yellowstone.
The creation of national parks set up in motion a vast movement to preserve public lands. State parks are similar to national parks, but the main difference is that they are under state rather than federal administration. The first state park, Niagara Falls State Park was established in 1885 in New York. As of today, there are more than 10,000 state park units in each of the 50 states. In addition, parks are also maintained by local government entities. All those parks are quite clearly named “state park”, “regional park”, “county park”, etc..
America’s federal public lands, owned equally by all Americans, have expended well beyond the national parks. They now cover about a quarter of the U.S. land (618M acres) and encompass many types of lands all with the word “national” within their name. They fall mostly into four systems, depending on the agency that manages them.
-
The National Park Service (NPS) manages the National Park System (84M acres), with 417 units, including 59 national parks. Although it is the most well-known land management agency, responsible for some of the country’s most famous landmarks, the NPS manages the smallest amount of land. The NPS mandate is both to keep landscapes unimpaired for future generations and to offer recreation. NPS lands are at the same time more regulated and more developed than others. They are discussed in more detail in the rest of the article.
-
The U.S. Fish and Wildlife Service (FWS) manages the National Wildlife Refuge System (150M acres), which consists of 562 national wildlife refuges and 38 wetland management districts.
Like the NPS, the focus is both on conservation and recreation, with both being more wildlife-centered than NPS lands. 86% of FWS land is Alaska. In the continental U.S., FWS land consists mostly of wetlands, and are often closer to cities than other public lands. 37% of FWS areas are located in the Pacific Ocean in four marine national monuments.
-
The U.S. Forest Service (USFS) manages the
National Forest System (193M acres), which comprises 154 national forests and 20 national grasslands. The USFS has a multiple-use mission, and their lands allow extractive activities such as logging, grazing, and mining, as well as a wider range of recreational activities. Many national forests are located near national parks. Unlike the other three federal land agencies, the USFS manages a significant amount of land in the eastern U.S.
-
The Bureau of Land Management (BLM) manages the National System of Public Lands (245M acres). Most of BLM lands were not set aside but inherited, are nameless, arid, and intended for multiple use, like USFS lands. However, a small subset of “flagship” BLM lands are designated by Congress and intended for conservation and recreation, forming the National Landscape Conservation System (32M acres) that includes 873 federally recognized areas, including national conservation areas. BLM lands are situated almost exclusively in western states.
Any of the lands above can also become a
wilderness area (“designated wilderness” or simply “wilderness”) by congressional designation. This provides for an
additional layer of protection on top of their current status. Wildernesses are managed to preserve primeval character without permanent improvements (such as roads) or human habitation.
wilderness study areas are set aside by the BLM as part of the National Landscape Conservation System while awaiting for their confirmation or dismissal as designated wilderness.

Eldorado National Forest
The National Park System
As of this post, the National Park Service (NPS) manages a total of 417 units, including both natural, cultural and historic resources of national significance. Here is the
complete list by designation type. Each of them is officially called a “
National Park System unit“, or any combination obtained by replacing “System” with “Service” and “unit” with “area” or “site”, but since all sounds a bit long, some refer to them as “national park” for simplicity and brevity. A more precise abbreviation – with fewer characters too – would be “park unit” or “NPS unit” because in the strict sense, “national park” refers to a specific designation. Yet the rather unspecific “park” is even shorter and has also been in use. Some say that “park” really means “national park”, but it could equally refer to “park unit”.
It is not a matter of capitalization (eg: “417 national parks v. 59 National Parks”) since, per all major style guides – including the Chicago Manual of Style, U.S. Government Publishing Office Style Manual, AP Stylebook – the correct usage is that “national park” is capitalized only when it is a proper noun, part of a formal name (eg: “Acadia National Park”).
It is understandable that some NPS officials favor the simpler term, especially when communicating with the public since, as will see shortly, the official designations are confusing. Others have explicitly stated to me that they do not. The point is that there is no consensus in the NPS that all NPS units should be called “national parks”. If you look at the National Park Service website, the terms they use are all over the place, which supports the idea that “national parks” is just a shortcut rather than a systemic use. If all the units were “national parks” as some argue, why wouldn’t the NPS always use the term “national park” to refer to them? Compare the NPS text:
How many areas are in the National Park System?
The system includes 417 areas
What is the largest national park site? Smallest?
Current information on acreage for units across the National Park System
What is the most-visited national park?
View a list of the most-visited sites in the National Park Service
with:
How many national parks are there?
The system includes 417 national parks
What is the largest national park? Smallest?
Current information on acreage for national parks
What is the most-visited national park?
View a list of the most-visited national parks
National Park System units include a total about 25-40 designations, depending on how you count them. The designation is in the full name of an area, for instance Yellowstone National Park or Devils Tower National Monument.
Besides “National Park”, those include but are not limited to:
- National Monument
- National Preserve
- National Historic Park
- National Historic Site
- National Memorial
- National Recreation Area
- National Seashore
- National Lakeshore
- National River
- National Battlefield
- National Battlefield Park
- National Battlefield Site
- National Military Park
There are many variations, but none of them are “national parks”. If Devils Tower was a national park, it would be called Devils Tower National Park, but it is not.
Just looking at the four types of military sites give you an idea of how confusing the nomenclature is. Personally, I’d favor three designations, one for primarily natural resources (maybe national scenic site),
one for primarily cultural resources (maybe national historic site), and national park.
National monuments
are different because they can originate from presidential proclamation, and they can be managed by other land agencies than the NPS. A national monument ran by the NPS should be either a national scenic site or national historic site, while non-NPS national monuments could keep that designation.

Point Reyes National Seashore
National Parks: the name matters
Amongst the 417 park units, there are currently 59
national parks. Those who call the park units “national parks” sometimes refer to those 59 national parks as “named national park”, “full national park”, “full-fledged national park”, or “national park with full status”. This in itself is an admission that there
is a difference between them and the other types of units. That difference is the name.
In theory, since the National Park Service General Authorities Act of 1970, all park units have the same legal status and protection. The collection of 417 park units is a system of equals. This makes sense because they do not want to put a hierarchy between Yellowstone or Gettysburg – they are simply different in nature. However, as Yogi Berra would say “In theory, there is no difference between theory and practice. In practice there is.” If the designation name did not matter because “all park units are national parks” like some argue, why did so many national monuments saw their initial designation changed to national park? This started with the Grand Canyon (national monument: 1908, national park: 1919), and since then a total of 25 national monuments have been redesignated as national parks. And if the designation name did not matter, why are there
several campaigns underway to upgrade the designation of Chiricahua National Monument, Craters of the Moon National Monument, and Indiana Dunes National Lakeshore, amongst others? The effort needed is not insignificant, as it requires clearing legislation in Congress, no easy taks in a climate of increasing partisanship and legislative gridlock. Only Congress (House and Senate) can designate a national park.
This report on the campaign to rename Indiana Dunes National Lakeshore states:
A U.S. House committee has advanced a plan to change the name of Indiana Dunes National Lakeshore so that it reflects the reality that it is a “national park.” … The Indiana Dunes already is a national park. This measure would make that clearer to tourists and local visitors by renaming it Indiana Dunes National Park … “I hope that the full House considers this important legislation as soon as possible, so that we can quickly begin to harness this national recognition of the Indiana Dunes…”
First, note that Indiana Dunes National Lakeshore already has “National” in it, so it is the “national park” label that brings recognition. Second, the idea that “Indiana Dunes is already a national park” would be self-defeating. It applies to other units as well. By that logic, all of them should all be renamed “national park”, not just Indiana Dunes. But if all the 417 units are renamed national parks, then how is that going to increase the recognition of Indiana Dune amongst them? If you look at
H.R.1488 – Indiana Dunes National Park Act, a long list of specific reasons is given why Indiana Dunes deserves to renamed a national park. The author of the bill recognizes that the national parks form a select group and intends for Indiana Dunes to join them based on its merits.

Chiricahua National Monument
National Parks: How do they differ from other units?
Since the very start of the National Park Service, the national parks were recognized as the crown jewels. Stephen Mather’s
National Parks Portfolio (1916) included 8 national parks plus the Grand Canyon – which at that time was a national monument only because legislation to establish it as a national park had failed to pass. Subsequent NPS-sponsored editions of the National Parks Portfolio illustrated most national parks extensively on several pages, while only a paragraph was devoted to each national monument. Prior to WWII, the NPS issued one set of visitor guides and maps for the national parks, and another for their other units (essentially national monuments at that time) with much lower production values. A careful examination of NPS documents shows that up to the mid 20th century, the NPS had no qualms stating that the national park designation should be reserved only for the most special areas, those meeting high standards – a position also supported by the National Park Conservation Association. In doing so, the NPS was comfortable with some park units being more equal than others. As recently as 1976, after a half-century of misgivings and efforts to disestablish Platt National Park because it did not meet the standards for the designation, the NPS eventually merged the 70-year old national park (the 7th) into a recreation area. More recently, Ken Burns and Dayton Duncan, who as historians have certainly a deep understanding of the National Park System, told its story mostly through the national parks, at the exclusion of other park units. In the companion book to the film, they made sure to include one landscape photograph (by me) for each of the 59 national parks, and none for the other park units. Although the recent official position of the NPS is that all units are equal, this hasn’t been always the case. The perception from the public and media has been that the national parks form a select group, and it continues to this day.
What sets the national parks apart? According to the
NPS nomenclature, “Generally, a national park contains a variety of resources and encompasses large land or water areas.” By contrast, for instance, “a national monument is intended to preserve at least one nationally significant resource. It is usually smaller than a national park and lacks its diversity of attractions.” This official explanation implies that national parks, being larger and more diverse, are more valuable. The NPS at one point argued against redesigning Pinnacles as a national park because the park unit did not “include the full range of resources usually found in national parks” (source). In other words, not worthy of the “national park” designation. The same reservations are even more valid regarding Indiana Dunes.
At the same time, the explanation allows for the inevitable exceptions (note “generally” and “usually”). Some of the exceptions stem from the way national monuments are established. Some of them stem from regional differences, for instance one would not expect a Midwest national park to match the natural resources of one located in Alaska, yet as a system representative of America’s nature, one would like to have a national park in the Midwest. There will also be exceptions that result from the whims of history, including personnal preferences of key players.
While from an administrative point of view, all parks units are equal, this is not the public perception.
The prestige of the national park designation attracts more public attention. There are quite a few books about the national parks, but only one covers all the NPS units. This prestige has been earned by the fact that historically, almost all national parks are large and diverse areas where international visitors could spend a week, something which could not be said of most of the NPS units. However, the recent renaming efforts were meant to bring more tourism to the local communities. I think this is a questionable reason for designating a national park. The mission of the NPS is to preserve the most unique sites in the country, not to increase tourism to particular areas, which is by definition a concern of local political interest, not national interest. Moreover, economic development should be viewed as a benefit of protecting beautiful lands, not the reason for doing so.
There is no evidence that a national park unit would receive more funding just for being designated a national park – rather than for the reasons that led it to being designated a national park. Although there is nothing in legislation which says explicitly so, in practice, national parks are subject to more regulations. Activities that consume resources such as extraction, hunting or off-road vehicle use are generally prohibited in national parks while authorized in other park units. Many of the Alaska national parks consist actually of a “national park and preserve” with the national preserve explicitly created to allow resource-intensive activities. Hunting is allowed in a number of NPS units, but it is prohibited in national parks with one exception, Grand Teton, because of a special Elk reduction program.
I mentioned before that “national park” is often used for brevity instead of “National Park System unit”. Some favor the term not only for brevity, but also to emphasize the equal status of all park units. To follow this logic to its natural conclusion would mean dropping all the confusing designations altogether and call all units “national park”. Are you ready for a Thaddeus Kosciuszko National Park (the townhouse where the wounded Polish freedom fighter lived, 0.02 acres) alongside Yellowstone National Park? Would that bother you that a townhouse without trees nor vegetation be incidentally called a “park”? How about a President William Jefferson Clinton Birthplace Home National Park? Would such a designation elevate the home, or devaluate Yellowstone, the national park “brand”, and eventually all its properties, including the home, and even the entire conservation movement? Does anybody seriously believe all park sites have the same significance? In any system of equals some entities are more equal than others. The national park idea, as embodied by the first national parks, inspired an entire conservation movement worldwide. Countries identified their most outstanding natural areas. Some park units are clearly international attractions, and some are not. Although from an administrative point of view, all units are equals, most would recognize that some are more valuable than others. If so, is unreasonable to distinguish them with a name? Calling all units national parks would dilute the significance of our most special places. An award doesn’t change any person, nor does it confer any special rights to them, besides calling themselves an award-winner, but that does not make it an insignificant nor useless label. With the “national park” label, when used properly, we are recognizing with a name what is a reality on the ground.
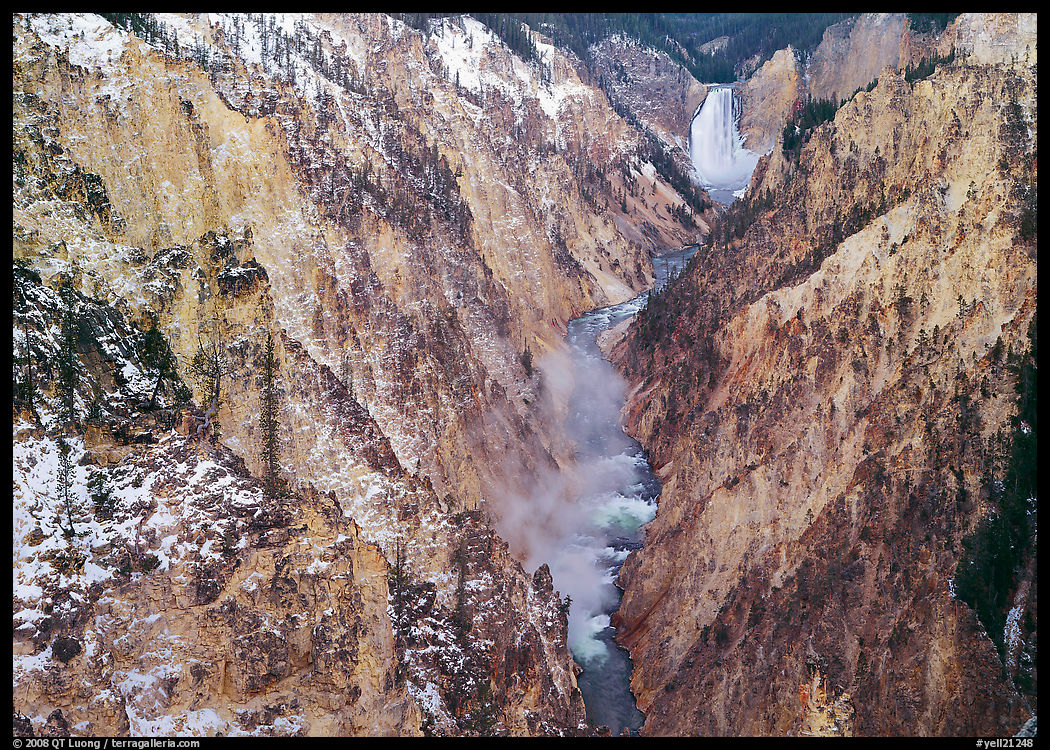
Yellowstone National Park
Would you agree that “national park” should be reserved for a selected group, or should all NPS units be called that way?