Seasons Greetings

Wishing you Happy Holidays, or Merry Christmas, and a great time with family and friends, full of peace, love and joy.
May your year 2017 will be filled with health, success, and creativity!
|
|
The Terra Galleria Blog – QT LuongQT Luong's updates and thoughts on photography, travel and nature
|
Wishing you Happy Holidays, or Merry Christmas, and a great time with family and friends, full of peace, love and joy.
May your year 2017 will be filled with health, success, and creativity!
One would also think that after Treasured Lands, I would have wanted a break from the national parks. One would be wrong. Floating on the internet, there is this plot of “Knowledge versus Expertise”, showing that the more expertise one acquires, the more one realizes how much more there is to know. I’ve been called by Outdoor Photographer “an expert on photographing the national parks”. Writing the book only sharpened my awareness of how many experiences there are to be had, corners to explore, and photographs to be made in those treasured lands.

With that in mind, in June, for my first trip of the year, I returned to Zion National Park to continue canyonnering explorations. The Subway has become world-famous. The common way to visit the formation is via a hike from the bottom of the canyon, but this misses some of the most beautiful sections of the canyon that I saw by traveling the entire length of the Left Fork, including Das Boot.

In July, I thought that to celebrate the NPS Centennial, we should try a national park road trip as a family. We began with Great Basin National Park, where I revisited Lehnman Cave after a 20-year hiatus, putting to good use much more capable technology.

While the family was sleeping, I sneaked out of the campground in Great Teton National Park and located a single lush patch of wildflowers in otherwise past peak meadows. This small spot and time window was enough for an iconic photograph that had eluded me on several previous visits, but I was still yearning to get closer to the mountains.

At Mammoth Hot Springs in Yellowstone National Park, the only constant is change. The area of Minerva Terraces that I photographed 20 years ago has dried out, and the activity had moved to Canary Springs. In the past family trips to national parks didn’t work out very well, though, and this trip turned out to be no exception.
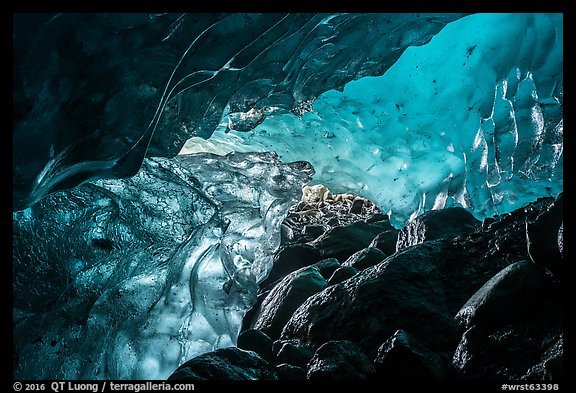
In September, for Alaska I made an exception to my regular solo travel. The Root Glacier in Wrangell St Elias National Park delighted with unexpected features like canyons, and waterfalls, but the most unique experience was to scramble under the edge of the glacier into ice caves where we were underneath surreally blue ice.

Since this was my fourth visit to Exit Glacier in Kenai Fjords National Park, I didn’t expect much, but I couldn’t believe my eyes when I saw that in less than a decade, the glacier had retreated several hundreds yards and its terminus had changed dramatically. To approach it, we had to cross streams with swift, knee-depth, and frigid flow.
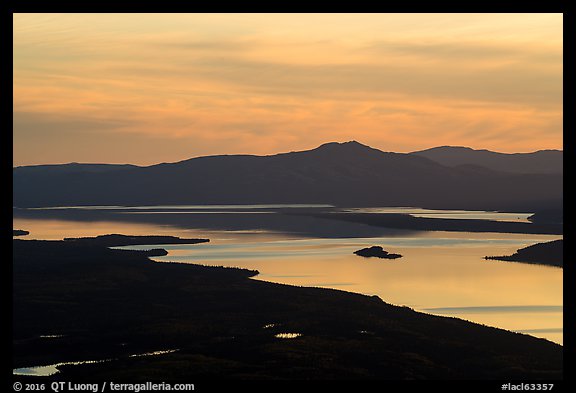
On the only sunny day of that week, I was pleased to go on an overnight backpacking trip and at least hike up a peak for the first time in the year, Tanalian Mountain in Lake Clark National Park. The trail climbed 3,200 feet for stunning views of Lake Clark, and on the way down I photographed the only colorful sunset of the whole trip.

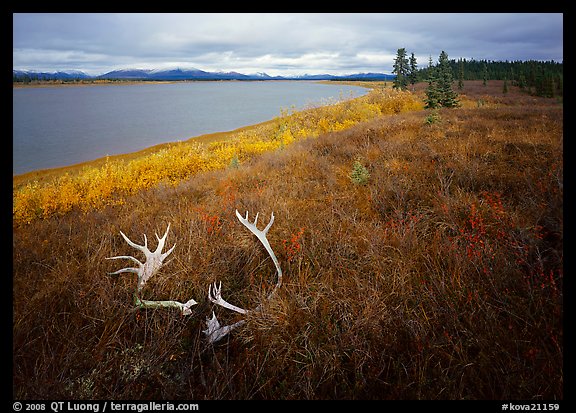
Although in Katmai National Park we did not miss the bears nor the Valley of Ten Thousand Smokes, my favorite part of the trip was hiking up another peak, Dumpling Mountain, 2,400 feet above Brooks Camp, where besides the views that I had for myself on that rainy day, the tundra delighted with its mosaic of autumn colors.

In October, I launched Treasured Lands at the Vegas Valley Book Festival in conjunction with a showing of my exhibit at the Major’s Gallery. This was an appropriate venue since Las Vegas has more National Parks (18) within a day drive (500 mi radius) than any other city in the US. After the festival, I drove to Bryce Canyon National Park to stretch my legs on the 8-mile Fairlyland Loop trail where I greatly enjoyed the relative quiet and diversity of scenery.

On the way home, I stopped in Joshua Tree National Park, where thanks to Jeremy Long and Tim Schultze’s guide, I photographed a couple of rocks I wasn’t aware before. Always keep learning, be grateful for any unexpected gifts!
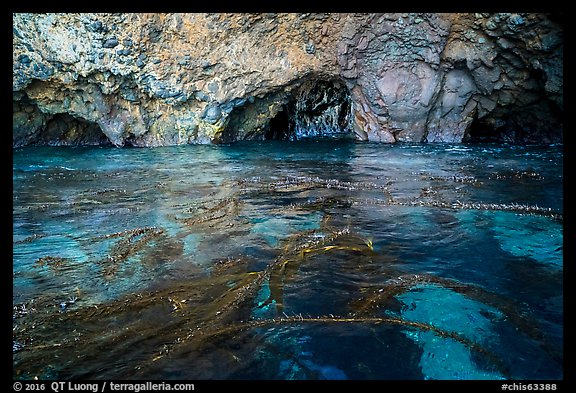
In November, on the eve of a presentation at UCSB Arts and Lectures in front of a 400+ audience, an improvised quick trip to Santa Cruz Island lead to beautiful discoveries and a new perspective on Channel Islands National Park via the waterline of a sea kayak
Despite my shortened travel year, I still visited twelve national parks in five different regions, and now have only two left to complete an unprecedented second round of visits to all 59 national parks. Although Treasured Lands begins to be recognized as “the” photography book of the National Park Service Centennial, my journey continues, and so does the fight for conservation. I am very grateful to all of you who have helped make the book a success. It is my hope that it will make you realize how much our national parks have to offer and to inspire you visit them, and that as result, you will demand of our leaders that they continue to preserve them, as well as other public lands, for future generations.
If you’ve made it so far, thanks again for looking and reading. I’d be interested to hear which image(s) you like most!


Many, such as 59 before 18, 59 National Parks, and Switchback Kids opt to continue the flight to the western end of Gates of the Artic National Park, which is less than an hour from the Great Sand Dunes, visiting the two remote Alaskan parks on a single outing. Because an overnight stay requires a drop-off and a pick-up by plane, therefore doubling the charter cost, most visitors spend between half an hour and one hour wandering on the dunes, fulfilling their goal of setting foot in the park. Seeking a more “immersive” experience, The Greatest Road Trip camped overnight near the dunes on a guided trip (considering “ill-advised” to visit “without hands-on guidance from those who know the region”), but despite “wanting to see as much as the park as possible”, they saw only the dunes and their immediate surroundings.
Visiting from the river provides you with a more intimate experience of the park. It could be done like Our Vie on a day trip arranged from a lodge in both Ambler and Kiana, the two Eskimo villages respectively upstream and downstream. Although you get to experience the park more fully, that day trip can be a more expensive option than landing on the dunes, as the cost the guided excursion is $1,500 on top of a round-trip flight from Kotzebue to the village. It is also more demanding than landing on the dunes since the hike from the river to the Great Sand Dunes is much tougher than the 2-mile distance would indicate because of the boggy terrain with tussocks.

While a flight to the Great Sand Dunes has to be chartered, Ambler and Kiana are deserved by commuter, regularly scheduled flights which are much less expensive. In 2002, the year of my visit, Bering Air charged $140 per person for Kotzebue-Ambler and Kiana-Kotzebue was $80. There was a luggage charge of $0.70/lbs over 40lbs, but we ended up paying less than $100 in excess luggage weight. Your boat needs to be transported by plane. We did not own a suitable boat, so we rented a Soar 16, an inflatable hybrid canoe/kayak, that carries two people and a lot of gear directly from SOAR, paying $225 for two weeks. Since we flew to Kotzebue on Alaska Air miles, the transportation cost to visit Kobuk Valley National Park for my wife and I was $765. That’s $383 per person ($515 in 2016 dollars) for the most complicated national park to visit.
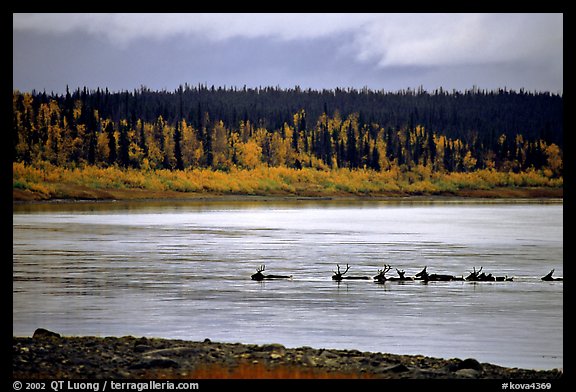
I am not going to say that one can embark on such an expedition casually, because you are traveling in the place that John McPhee called “the most isolated wilderness I would ever see” in Coming Into the Country. However in summer, there is a fair amount of native traffic along the Kobuk River, which mitigates the risk of the adventure. Like for the rest of my national park personal trips, I traveled self-guided, for the heightened sense of adventure, self-sufficiency, and discovery – not to mention the budget savings. Unlike for all but a few trips, I traveled with a companion, my new wife.


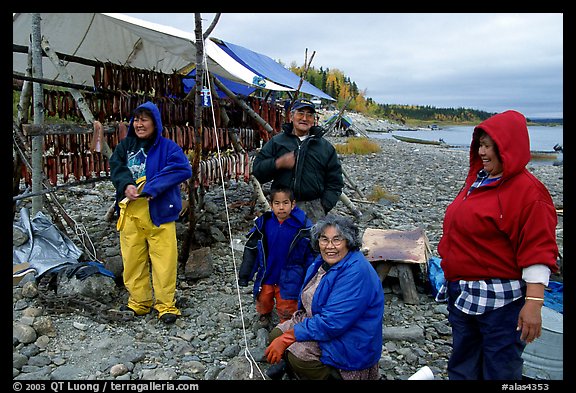
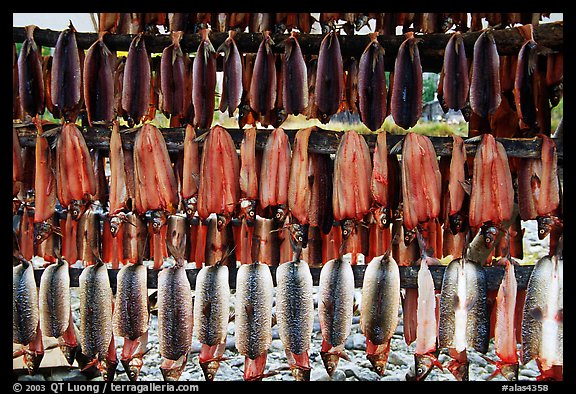

Along the way we got the privilege to meet with the native Inupiaq Eskimo, starting from the moment a family gave us an “airport shuttle” ride in Ambler. Interacting with those exceptionally friendly and helpful people, and getting to see their traditional way of life was a highlight that we would have missed with a quicker trip. And although this was purely theoretical, I got the chance to photograph seven sunrises and seven sunsets in the park.


Although based on a single park, you can now see the difference between my 59 national parks project, and the documented ones by others. Due to its remoteness, Kobuk Valley is one of the two national parks I have visited the least. I took a single trip there, whereas in average I visited each national parks four to five times. I think this depth is reflected in Treasured Lands. All the landscape images in this blog post are included in the book.
I am naturally intrigued by national park travel projects in which photography plays a role. A few of the travelers do not describe themselves as photographers nor do they make a living in photography. However, although video is growing in popularity, photography remains such an effective form of communication when it comes to actually sharing the beauty of the national parks, that it is invariably part of those endeavors. Besides checking out how others saw places I had photographed, when the details are available, I enjoy reading about what they’ve done there, how they reacted to the places, and how they traveled. I hope you will also enjoy traveling vicariously via those sites.

Although he made a living in commercial photography, Stan Jorstad (1922-2013) was possibly the first photographer in the late 20th century who made a goal to photograph all the national parks. He was the first to do so when there were 54 national parks, the subject of his book Those Rare Lands. When there were 57 and 58 national parks it is unclear if he or I was the first – my inquiries were not answered. Completing the project in his late years, his travels were frequently facilitated by the help of his family who also helped circulate a well-traveled exhibit. Although old age prevented him from photographing #59, Pinnacles National Park, he amply deserves a mention in this list, as his son continued his legacy by doing so. Jorstad’s photography is distinguished by his masterful use of a 6×17 panoramic camera.

Working over an extended period of time, traveling sometimes quite extensively in each of them, Jerry Ginsberg was the first person to photograph the 59 national parks using roll-film medium format cameras. He supported his travels with a technology job like I did for the first part of my own project. Besides the unusually large set of images on his website, he writes a series of articles about national parks for the North American Nature Photography Association.

Andrew Thomas, a graphic designer and photographer, came all the way from Australia to run a marathon in Death Valley in 2007, and in the subsequent 8 years would return 16 times to the US, making him likely the first person living on a different continent to photograph the 59 national parks – a feat not accomplished by many leading American landscape photographers. He even included the 3 abolished national parks for good measure in his book The National Parks of the United States: A Photographic Journey, published just in time for the NPS Centennial.

Mark Burns, a commercial photographer from Texas, drove more than 150,000 miles in a Toyota FJ from 2011 to 2015 to photograph the 59 national parks. Using a medium format digital camera, he rendered the prints in timeless black and white for an exhibit that traveled to museums with a combined attendance in the hundreds of thousands during the NPS Centennial year.

Don and Shelly Hafner, both working professionals in their mid-50s, hit the road with a RV trailer to visit the 59 national parks in 59 weeks from April 2014 to July 2015, proving that it is never too late to follow your dreams. This was the first time such a trip was undertaken, though the idea would gain in popularity for the NPS Centennial as seen in the next entries. They chronicled their trip in a blog, are preparing a memoir, and are now trying to sell photos from the trip.

From 2009 to 2014, the Goldsteins visited the 59 national parks during vacations, their goal being to see all of them as a family before their two boys would turn 18. In the process, they created a blog with photos and a video episode for each visit, and its popularity has made it possible to start a business selling T-shirts. That’s the project I am jealous of, since my family visits cause marital problems.

From August 2015 to August 2016 (the NPS Centennial), Elizabeth and Cole Donelson, two married 26-year-olds, left their fledging careers for a year to visit the 59 national parks by engaging in various adventurous outdoor activities in each of them, all on a budget of $20,000 that they saved by working extra side jobs. A main goal of their trip is to share their experiences via their blog with iPhone photos and video to raise awareness of the parks among their generation, the Millenials.

Darius Nabors and Trevor Kemp, both in their early 30s, partnered to visit all 59 national parks in 59 weeks from June 2015 to August 2016, supporting their travels partly by crowdfunding. They traveled deep in the backcountry, often logging an impressive number of trail miles in a day, and even rafting the Grand Canyon on a private trip. The effort is documented in a beautiful and well-structured blog that recounts their adventures day-to-day.

Jonathan Irish, a professional outdoor photographer and Stephanie Payne, a writer, are a husband and wife team on a National Geographic Traveler assignment to visit all 59 national parks during the year 2016. Unlike other NPS Centennial road-tripers, they are media professionals with abundant support (they travel in a Airstream towed by a 4WD SUV) working in the field rather than focusing on having fun experiences. This has resulted in the most content-rich and well-designed website of those projects, with multiple media and stories not only about their travels but also about the parks.

Conor Knighton, CBS Sunday Morning correspondent, produced and reported the series On the Trail consisting of stories about the national parks that aired every other week on CBS Sunday Morning during the year 2016. In the process, he spent the whole year visiting the 59 national parks and sang America the Beautiful in each of them.

Cees and Madison Hofman, a newly married couple just graduated from school whose story started in a national park, are visiting the 59 national parks in 9 months, starting from April 2016. They drive a 1989 Toyota motorhome named Vie, go everywhere with a leashed kitty named Vladimir Kitten, often carry foldable Oru kayaks to various bodies of water large and small, and set up slacklines in odd locations. Besides the quirky blog with photos and videos, they’ve developed a following on Instagram and even found sponsors.
Do you know anybody else who shared their travels to the 59 national parks ?
Outdoor Photographer publishes material on the web one month after the printed magazine is out. The web version has photography tips that were left out in the print version, so even if you saw it in print, check it out!

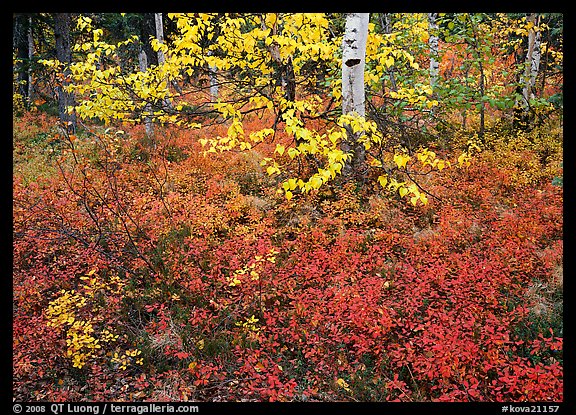
The images in the article depict fall foliage as leaves on trees, but there is more than that to it, and I’ll share a few in this post. At northern latitudes, the ground cover takes on magnificent colors in autumn. Let start where the OP article ended, in Denali National Park, with an image quite appropriate for Thanksgiving, which should by now be familiar 🙂 although it was chosen for NOT being an iconic view.
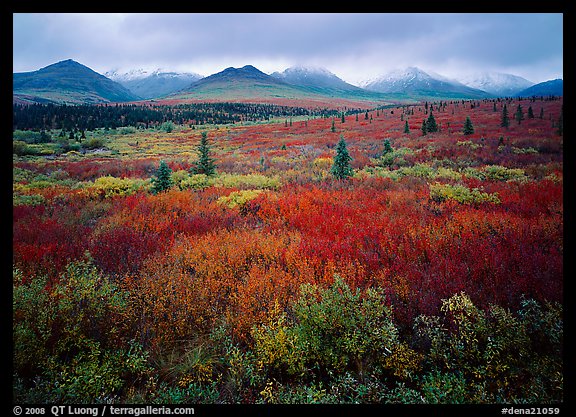
Healy Ridge from Park Road, Denali National Park
The tundra colors near Savage River peak in early September. There are distant views of Denali, but on a rainy day, I chose instead a composition in the other direction, with a closer and lower mountain range in the background. Clouds enveloped the higher Alaska Range all day, but for a moment, they lifted off the Healy Ridge slightly. The soft light revealed the color palette of the tundra, whereas, on a sunny day, the contrast would have made everything one shade of red. A graduated neutral density held detail in the cloudy sky.

Cadillac Mountain, Acadia National Park
One doesn’t need to travel to Alaska to see similar ground color. It is found in patches on the mountains in the northern latitudes of the continental US, such as in Maine, Washington, and Montana. At lower latitudes, the fallen leaves provide ground color and can be just as evocative as those on the trees as illustrated by two images which initially caught Sawalich’s eye.
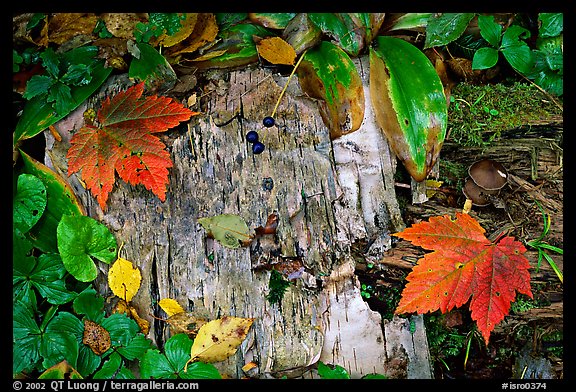
Maple leaves and weathered wood. Isle Royale National Park
For my first visit to Isle Royale National Park, I chose Windigo because it the park’s entry point closest to the mainland. A storm developed on Lake Superior, and because the ferry would not attempt the dangerous crossing back to the mainland, I was stranded on the wild island, together with the other visitors. The captain of the ferry cooked a large pasta pot for everybody. Afraid of missing a sudden departure, I limited my explorations to the nearby forest around Windego. The west side of the island supports maples that produce richer fall color than the trees on the east side, which is mainly covered with fir and birch. However, the views around Windego consist mostly of woodlands, rather than open views of shores or ridges. I looked for intimate forest scenes along the Windigo Nature Walk. Eliott Porter wrote “Sometimes you can tell a large story with a tiny subject.” I sought to photograph a microcosm of the island, by creating a composition with as many woodlands elements as I could include: undergrowth, fallen leaves, weathered wood, berries, mushrooms, moss. Even for those small forest scenes in overcast light, the polarizing filter made colors more vibrant by mitigating the glare from the leaves.

Spining leaves and cascade. Shenandoah National Park
Shenandoah National Park is known mostly for the views along the Skyline Drive, but below the crest, one will also find many streams and waterfalls. I combined visits of Dark Hollow Falls and Rose River Falls on a loop (5 miles; 1,000-foot elevation gain) along the exceptionally beautiful Hogcamp Branch of the Rose River. The fast-flowing river creates hundreds of small cascades that offer more possibilities than the two waterfalls. I initially set out to photograph just the cascade, but then noticed a swirling motion in the pool. Since I was photographing on film, I was uncertain about the exposure length that would add the best sense of motion, so I tried a variety of shutter speeds by changing the aperture. Being in the national park doesn’t necessary mean photographing the grand scenic landscape. The small details can be as beautiful and evocative, and lead to more personal photographs. One would think that those small details can be photographed anywhere, without need to travel to a national park. While this is true, I have found that being in such an inspiring place as a national park puts me in a frame of mind where I look more carefully.
Since I have photographed fall color in 36 of the 59 national parks, you’ll find even more fall foliage images in Treasured Lands, where the seasons are discussed in detail for each national park.

Yosemite, one the most popular and oldest national parks, has inspired photographers from its creation. Carleton Watkins and Ansel Adams created some of their most important work in the park. More recently, photographers as different as Galen Rowell, William Neill and
Michael Frye left their distinctive visual mark there. Having studied many photography books about Yosemite and even authored one (
Although it is a big challenge in a park with a such a long photographic history, Nancy Robbins, the photographer for the book, has managed to find plenty of new takes on familiar scenes. In “Redbud at Tunnel View” an unexpected patch of pink adds an element of surprise to the iconic scene. Likewise, in “A View of Nevada Falls”, a foreground of summer flowers provides an original touch to another classical view. Since she began to photograph extensively Yosemite after moving there in 2004, I assume the book was photographed with digital cameras. Their dynamic range enabled images such as the splendid “Yosemite Falls and Half-Dome” whereas their sensitivity – and the ease to make composite images opened the door to night photographs such as “Star Trails above Bridalveil Falls” and “Horsetail Fall, afterglow”. The photographer’s proximity to the park made it possible for her to capture elusive seasonal spectacles such as a rare cluster of twenty four snow plants (one would be lucky to see just a few!) or frazil ice flowing down Lower Yosemite Falls, a phenomenon that was mostly overlooked until a Yosemite Conservancy video brought it to wide attention. When the Meadow Fire broke, she was there on the first evening for a striking photograph, whereas I arrived on the second evening, when the fire’s intensity had been greatly reduced thanks to the firefighters efforts.
Its deservedly famous views of cliffs and waterfalls are among the most spectacular in the world, but Yosemite Valley’s vistas represents only a small fraction of the beauty the park has to offer. A Sense of Yosemite does a good job of giving a survey of the park, including at least an image of each major sight, and although the high country (which represents 95% of the park) isn’t very well represented, its most prominent locations and accessible locations are there too. On the other hand, Robbins shines in capturing the whole range of nature scenes, from spectacular light and atmospheric conditons (fog!) on the grand landscape, to the more intimate details which may be a natural outlet for her experience as a portrait photographer well acquainted with the place. “winter’s chill” superimposes patterns of frozen ice and fallen leaves to combine two seasons. A section of the book showcases the passing of the seasons, and at first I thought that the heading “Finter” was a typo. Upon reading the captions, I understood that Robbins was referring to the brief collision of Fall and Winter at the same time. Unlike in other landscape books (think Ansel Adams and his followers), wildlife makes a frequent appearance, and the animal portraits contribute to the overall joyfull tone. The image sequences of a coyote catching a prey in winter, and of “Twenty Minutes in the Life of a Ladybug” showcase it in a playful and cinematic way.
The choice of images, themes (which even include a “black and white” section), and sequencing in A Sense of Yosemite give a kaleidoscopic representation of Yosemite as a sum of many parts and viewpoints. The park appears as a collection of glimpses. The texts that accompany the images reinforce that impression. Robbins’ words consists of captions that mostly emphasize her own experience of the place as a photographer. The essays by David Mas Masumoto, as somehow expected from a farmer, are down to earth. They are each one page or less, and rather than focussing on natural history or conservation as is often the case, elaborate in a personal way on our relationship with the park via multiple approaches. Both form an accessible and rewarding dialog. After an essay by Mas Masumoto entitled “The Nature we hear”, a great spread contrasts Fern Springs – shot with a low viewpoint that emphasizes its waterfall-like appearance, with Upper Yosemite Fall from Fern Ledge, and in the captions Robbins evokes the “sweetest babble” of the former and the “thunderous” sound of the later. Overall, this beautiful coffee-table book lives up to its promise of giving us a “sense of Yosemite”.
Last Monday, after picking up the kids at 2:30pm, I found that my preparation for the multiple presentations to be given in Santa Barbara on Wednesday was essentially completed. I decided to use the extra day for a quick trip to the Channel Islands, since the Channel Islands Harbor in Ventura is just half-an-hour from Santa Barbara. With little time left, I looked on the internet for fifteen minutes before booking a trip with an outfitter, Santa Barbara Adventure Company for the next day. The cost of $179 is very reasonable considering that it includes Island Packers ferry transportation, use of the kayaks and services of a guide. I received a gear list by email and packed everything in one hour (including 50 copies of Treasured Lands), then drove five hours from San Jose to Ventura. The next morning, I noticed near the Island Packers office another outfitter even offering walk-in kayak tours. Embarking on a national parks adventure doesn’t necessarily require much advance planning!
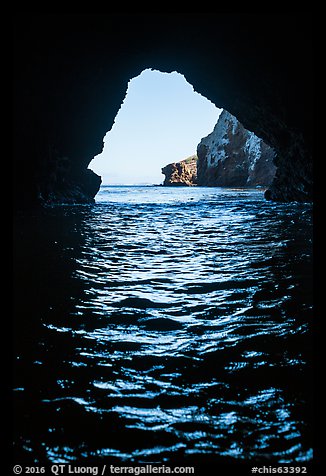
Of all the islands, Santa Cruz is the best choice for a day trip. Because Anacapa is so small, the trips there are set up in a way that doesn’t leave much time on the island. The three other islands are just too far for a day trip. I had explored hiking trails on Santa Cruz island on a previous trip. On two occasions, on the return from an outer island, the Island Packers boat visited Painted Cave, one of the largest sea caves in the world. It was impressive to see the large vessel entering the sea cave, but the experience left me yearning for a more intimate exploration. I had read that one of the most remarkable features of the cost of Santa Cruz Island is the concentration of beautiful sea caves.
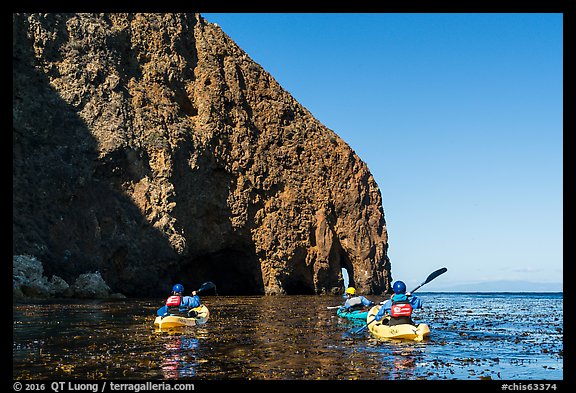
Having previously experienced calm waters on autumn scuba diving trips to the Channel Islands, I was surprised by the strong wind and swell on Tuesday. For the first time in several decades, I even got seasick towards the end of the crossing to Santa Cruz Island, which made for a rattling start to the day. The authorized outfitters have each a spot on the beach of Scorpion Anchorage where they store kayaks and gear, making the logistics simple. Santa Barbara Adventure Company provided everything which was needed, even some of the items on the packing list, such as water shoes, eyeglass straps, gloves, and sunscreen, so in fact you didn’t need to bring anything particular rather than a bathing suit to wear under their wetsuits, a water bottle, and a snack.

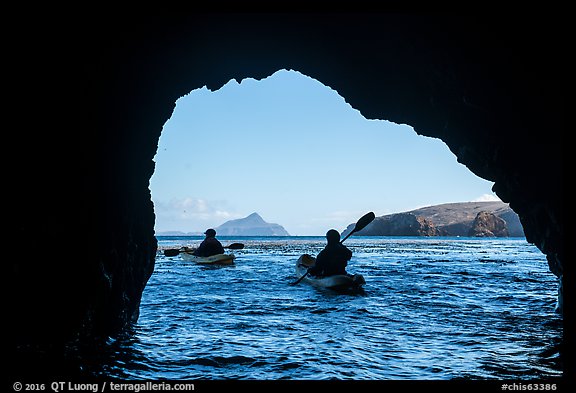
It was a beautiful day, quite balmy for November, but paddling upwind was tough, especially with the sit-on-top kayak not feeling very stable in the swell compared to the sit-inside kayaks I am used to. The possibility of flipping over at times didn’t seem so remote. We spent about four hours on the water, and paddled maybe a total of 2.5 miles, both to west and to the east of Scorpion Anchorage, where we launched the kayaks.
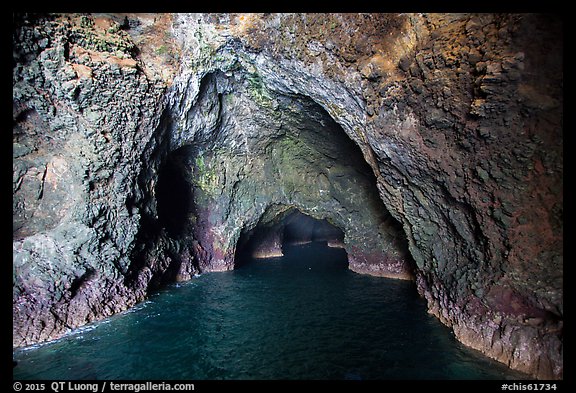
Within this distance, we visited four different sea caves. Most of them form a tunnel, which means that you enter via one end, and exit via a different end, which makes for a fun exploration. Sometimes, the tunnel was barely wide enough for a kayak.
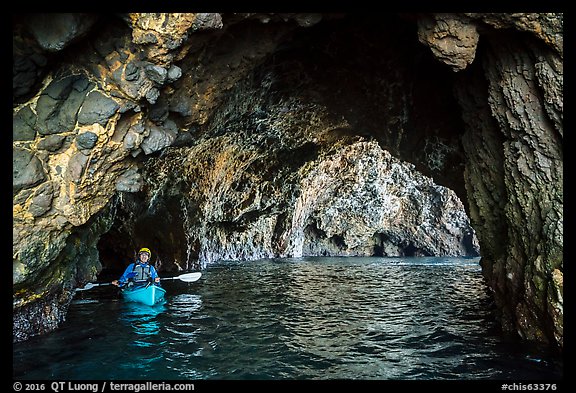
Besides making paddling quite strenuous, the swell also preventing us from exploring a few sea caves, where the water was too turbulent. One of the caves we visited has normally exquisitely blue water, but that day, the color was hidden by whitewater! The swell made the photography challenging on two counts. First, I often had to keep the camera in the dry bag that I kept between my legs to prevent damage from water splashes. In retrospect, given the rough water conditions, I should have used a waterproof enclosure rather than a dry bag. Second, the kayak was often rocking, which required me to use a faster shutter speed, which combined with the dim light in the caves often resulted in a high ISO. And while snapping the pictures, I had to be careful not to hit rocks too hard!
An advantage of the mid-week, November trip is that the group was small. It was just two Canadians, our excellent guide Kyle, and me. Towards the end, I got quite tired and was glad to be standing on firm terrain again. However, it was a great experience that opened my eye to new possibilities. I had stood on top of the same cliffs, but did not suspect the beauty which could be seen by entering them from water level, a short distance below. I am already planning to come back earlier in the season, in August or September, when conditions are often more calm, traveling with friends or family for more flexibility.
On Wednesday, I delivered three different presentations about “Treasured Lands”. The first one took place at the Carpinteria High School, which serves a semi-rural community with a large Hispanic population.

Since I had been warned that the kids there can be quite rowdy, I was pleased to be able to hold their attention and try to inspire them to visit a national park. They are the future generation for which the parks are preserved, and the constituency that our parks will need as advocates in the future.

(photo by Cathy Oliverson)
Since I did not go to art school, nor did I receive any formal training as a photographer, I was honored to present and answer questions at the UCSB College of Creative Studies in the afternoon.

It was cool (and humbling) to see the announcement for my evening presentation next to Joan Baez in the UCSB Arts and Lectures season catalog. It was part of a lecture series celebrating the National Park Service Centennial and the other speakers were Ken Burns, Dayton Duncan, Douglas Brinkley, and Terry Tempest Williams.

Maybe due to the competition from the World Series Final, Campbell Hall was only half-filled despite press announcements but since the auditorium, largest on the UCSB campus, seats 800+, that was still a great turnout for me. I found it rewarding that the 40+ people who came on stage to have their copy of Treasured Lands signed afterwards said they enjoyed the presentation greatly.

(photo by Roman Baratiak)
I will be making arrangements for more events in 2017. If you have suggestions for venues, they would be most welcome!
Also, I will hold a more intimate session, more focused on the creative aspects of the project, with USCB College of Creative Studies in the afternoon. Details here. I’ll spare you details of the school visit, although I am always excited to share with the younger generation!

Naturally, I’ll have a quick trip to the Channel Islands tomorrow. See you on the water ?
“Caring for People & the Land” is a book signing and talk with QT Luong and Mark Tuschman. QT Luong premiers his new book, “Treasured Lands,” large-format photographs in each of America’s 59 National Parks. Mark Tuschman’s beautiful large format book, “Faces Of Courage:Intimate Portraits Of Women On The Edge,” speaks to the resilience of women and girls in a challenging world.

In the words of curator Geir Jordahl:
Caring for People & the Land brings together two brilliant photographic artists, QT Luong and Mark Tuschman. Their works are not only colorful, evocatively lit and elegantly composed, they also go beyond the surface to touch our heart and stimulate our thoughts. Their subjects strike a chord in us – they show us the land we love and people we need to care for. In juxtaposition, their pictures suggest interconnectedness. People, regardless of their place in the world, live in the land and are nurtured by it. Injustice and discrimination, regardless of where it takes place, effects us all. A neglect of the natural world has equally detrimental effects. By showing us human resilience and the beauty of the natural world we leave energized and empowered as well as enlightened to the responsibilities we share in protecting our planet and the people that inhabit it. Mark Tuschman and QT Luong give us inspiration to use our photographs and our words to change the world.
Talks and book signing, Sunday Oct 23 from 1:00PM to 3:00PM PhotoCentral, 1099 E Street, Hayward, CA 94541
The problem is that they’ve been together for a very long time, long before he married me. So, I am not sure who has the “Right of Way” here.
Their relationship is a perfect one. They truly click. She has an eye only for him. She is dependable, patient, quiet and steadfast–all the traits men want from their woman. He can really see things from her perspective. He can read her mind, can push all the right buttons to make her happy–qualities that women yearn from their man. They share a deep passion for the great outdoors. They often travel together, camp together, hike together. She would sit on his lap every time they board an airplane. On cold nights, he would hug her close, so that her big, clear eye would not be all fogged up. When they come back from the beach, he would wash her multiple legs so that her joints would not feel creaky from all that salt water…
They savor every second spent together. He would head out with her at the crack of dawn, returning long after dark, leaving me waiting, worrying. Sometimes, I tag along, just to see what happen. That was a bad idea. At the end of the very loooong day, I would often find myself seething with resentment and green with envy, not to mention being tired, cold and hungry. With her by his side, he is oblivious to the people around him, me included. He is too busy focusing on her, capturing their sweet moments with her impeccable visual memory. I still remember vividly that time at Piazza del Duomo, Florence. There was so much to see and to share, but my husband was dashing around, hugging his mistress, ignoring me completely.
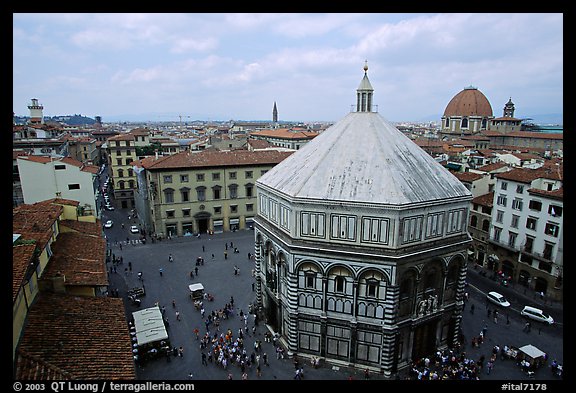
I was down there, alone. He was up there somewhere, with her!
And that trip was supposed to be our time together, not one of his rendezvous that I just happen to tag along! Seeing the tourists strolling hand in hand, talking, laughing, eating, enjoying their time together only exacerbated the situation. I felt so acutely the intrusion of this Cyclops into my marriage.
To date, I still don’t know how to make it work for the three of us. At home, he is a sweet, devoted husband and father, a man without any vice (except for his infatuation with this Cyclops). At home, she knows her place and just stands quietly, unobtrusively in a corner. She is even useful sometimes, documenting our memorable moments with a couple blinks of her lone eye. Only when we go on a trip all together that tension ensues. Many times, I want to give my husband an ultimatum: leave her home on OUR family vacations. But I know he would be at a loss without her spongy tentacle wrapping around his neck. He would not know what to do with his empty hands. He would be so dejected and would miss her terribly. So, I conceded. My husband is more aware of the three-some problem now. He is trying his best to stay focused on us instead of running off with her when we are on the road. But her lure is strong. Relapses happen. Just one wink from her, he’d be lost to me. I’d find myself left alone with the kids on the hiking trails, desperately trying to deal with their complaints of heat, cold, boredom, fatigue, hunger etc…while he was enrapturing with her elsewhere.
Look at them! Kissing under the cover!
They even had a love child together! My husband had been pregnant with that child for the past 20+ years (yes, that’s what happen when you hitched a Cyclops, you carry the load; she gets to keep her slim figure). He recently gave birth to a chubby, 7+ lbs baby. What an exquisitely beautiful thing it is!
Looking at that child brings back fond memories of the time we share at some of the most beautiful spots on earth. Reluctantly, but I have to thank her for that. Without her insatiable thirst for a change of scenery, my husband–and thus, us–would not have ventured out to enjoy all that natural wonders. This child brings a redeeming quality to my husband’s affair with the Cyclops, but it also ensures that she is here to stay. I guess I have to learn to accept this three-company. Only if she could also supervise the kids, cook and clean, then the situation would be much more tolerable.
So, please tell me what am I supposed to do?
Lanchi Vo is full-time woodturner and fiber artist. To see her creations, visit Elvio Design. This post originally appeared here.
See the photo galleries: Click Here
QT Luong was the first to photograph all America's 63 National Parks - in large format. He received the Ansel Adams Award for Photography from the Sierra Club, the Robin W. Winks Award for Enhancing Public Understanding of National Parks from the National Parks Conservation Association, and was featured in the film The National Parks: America's Best Idea. His photographs are extensively published and have been the subject of five books including Treasured Lands (winner of twelve national and international book awards), many newspaper and magazine feature articles, solo gallery and museum exhibits across the U.S. and abroad.
This blog, at terragalleria.com/blog, shares field notes from that long-term work in public lands along with occasional updates on newer projects. It sits alongside the main Terra Galleria archive at terragalleria.com. For QT Luong’s current fine-art projects and a tightly curated presentation of photographs organized by series, please visit qtluong.com.
![]()
![]()
![]()
![]()
![]()
![]()

