In the autumn of 2012, William Sawalich interviewed me in a wide-ranging conversation. Only a small part of made it into a profile in Outdoor Photographer. With his gracious permission, I am publishing today the entire interview. Probably more than you wanted to know, but at least you’ve got plenty to read while I am working on the national parks book!
William Sawalich: Ansel Adams is the elephant in the room. Every serious landscape
photographer – especially if they’re working in b/w, and especially if they’re working with an overt message of conservation-gets compared to Ansel Adams. Can you talk about what impact-if any-Ansel has had in your life and on your work? Do you do much (or any) b/w work? Are there other photographers who have really influenced you in your career?
QT: When I was living in France, I wasn’t aware of Ansel Adams
(photography in France was dominated by the “humanist reportage”
tradition dating from Cartier-Bresson and continued by Doisneau,
Depardon, and Salgado). It was after I moved to Berkeley,
California in 1993, that I discovered his work. I saw some of his
original prints in local galleries and museums. They made such a
great impression on me. That was the first time I’d seen large format
landscape photography on the wall. I had never seen such beautiful
prints. Perfection ! In the summer of 1993, after further study of the
West Coast landscape photography tradition, I decided to learn large
format photography myself, which vastly impacted my
photography. Besides, what I learned from studying Ansel Adams was
that the landscape is not a fixed subject, but something as transient
as the light that makes it visible. This was particularly well
exemplified in his series of Discovery View or Old Faithful. When I began to study his books to learn more about photography, I understood his contributions to the environmental movement, and how important it was to continue those efforts. This provided an added motivation, besides just trying to please myself.
I view Adams mainly as a roadside photographer. He
traveled the backcountry of the Sierra Nevada – with mules
and often much larger groups than is possible today – but he made a lot of his best known photographs close to the car. That’s not how I
came to photography. I was initially interested in photography as a means to communicate to people who weren’t there the
wonders I had seen on the high peaks of the Alps. I first realized
that the type of mountain photography I was doing could be elevated to
an art form through the words and images of Galen Rowell. Rowell’s aim was to be a participant in the scene and not just an observer.
Without his climbing skills and his prodigious stamina, Rowell would
not have been in the position to make some of his most memorable
images. Although compared to his, my outdoor skills were
modest, I intended to use them fully in my adventures.
I do reinterpret images in black and white, but all my image capture
is in color. This brings me to two other influences: Eliot Porter
showed me how to see subtle colors and patterns in the complexity of
nature, and also that beauty can be found in very ordinary-looking
scenes, if one cares to look enough. The first book of nature
photography that made a profound impression on me was his “Nature’s
Chaos”, which weaves together strands of science (Porter worked as a
medical research scientist until his 40s) and art. Although it was
Adams who opened my eye to large format photography, when I began to browse books for inspiration and to learn about new locations
(national parks and other wild landscapes), I always gravitated
towards David Muench. His productivity and dedication made him the
most direct role model for me. I learned from him more compositional
techniques: how to use wide-angle lenses to place the viewer in the
scene, the importance of finding an excellent foreground, that with
large format images one can include multiple points of interest.
I understand you have an interesting scientific background. You actually have a PhD in artificial intelligence, yes? How does one go from a career in science/academia to a career as a photographer? And how has that research background influenced your photography? (Do you feel you take a “scientific” approach to your photography in any way? Or is it a strictly creative endeavor?)
For the career transition, see:
From amateur to full-time photographer.
My work was in artificial vision, a subfield of artificial
intelligence, concerned with teaching computers how to see. The kind
of mathematics I was working with had to do with geometry, the
organization and perception of space, and the relationship between
space and the two-dimensional image. So, in some sense, it was a
different take on some of the problems photographers have been facing.
More generally, what I learned in science was the ability to make
sense of patterns and structures. There was also the practice of trying to understand what is seen and making systematic comparisons.
All skills that came into play when I photographed each of the
National Parks with some typological depth, on trips which were research-based. I was interested in the individual character of each place, how each one represents a set of
unique ecosystems, yet collectively, all are interrelated,
interconnected like a giant jigsaw puzzle that I was deciphering,
The bio photo of you that I saw shows you working with a large format camera. Is that still your preferred approach? If digital is a part of your workflow at all, can you tell me a bit about how it fits in alongside film? And if your work is entirely analog, can you tell me a bit about why?
I still occasionally use the large format camera, but digital is now
an essential part of my workflow. In the past, I have carried the
large format to pretty remote places, but for those situations
nowadays I enjoy the much lighter digital kit. So I guess after
trying to combine the spirit of adventure of Rowell with the
perfectionism and techniques of Adams/Porter, I now work with the
large format mostly roadside, just like Adams. Adams and Porter used
smaller format cameras in their later years. Nowadays, we are lucky
that relatively small digital cameras produce much better results than
their 35mm counterparts.
However, there is more to this transition than combatting the effects
of aging! Although it can provide superior image quality, the large
format camera has never been suitable for every subject and situation
The high sensitivity of digital sensors opens up new possibilities. A
good example is night photography, where it is possible to create
images that were never possible before by capturing the star field in
relatively short exposures. I find that a very exciting
development. During my last national parks visits, I stayed up late
many nights. It’s a great feeling to be experimenting again, learning
new techniques, and creating new images.
I also read in your bio that your website is one of the most visited among photographers and artists. Is this a coincidence, or the result of very careful and deliberate marketing and SEO efforts?
The “coincidence” is maybe that in 1993 I had a website, but since 2001 this has been very deliberate.
From a business point of view, my goal was to rely only on the internet at the exclusion of traditional promotional/selling methods. SEO was what made it possible.
Nature is clearly your love (or A love, anyway), but is it more apt to say it’s the National Parks that really hold a special place for you? By that, I guess I’m asking if the National Parks draw you simply because they offer such a great way to experience nature in the raw. Do you think coming from Europe made the American West even more amazing when you first experienced it? Maybe a better way to ask that is how you think growing up in Europe has affected your appreciation for the very wide open spaces of the American landscape.
What changed my life was indeed the experience of nature. I first gained that through mountaineering in the Alps, but high peaks of the Alps are pretty much all the remaining wilderness in Europe. In the national parks, this is magnified by the variety of the terrain which has remained wild.
Yosemite was the first park I visited – I would subsequently return
to there time and time again to explore its vertical world, as well as
to hike and cross-country ski. In the spring of 1993, I visited my
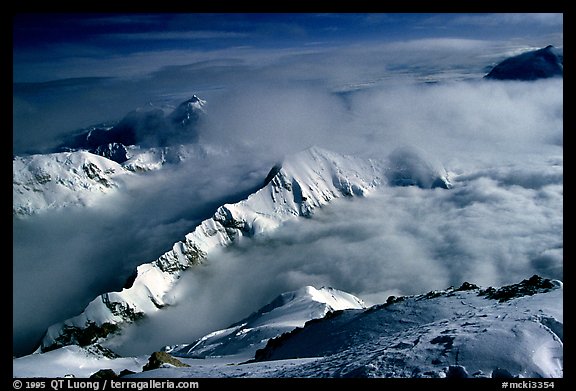
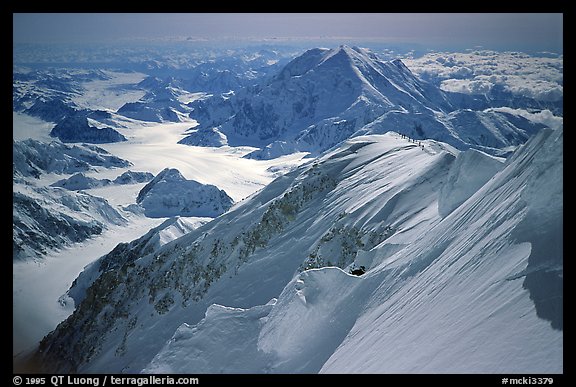
second National Park, Denali, to climb Mt McKinley solo. The focus
during those first parks visits was on mountaineering. In Nov 1993, I
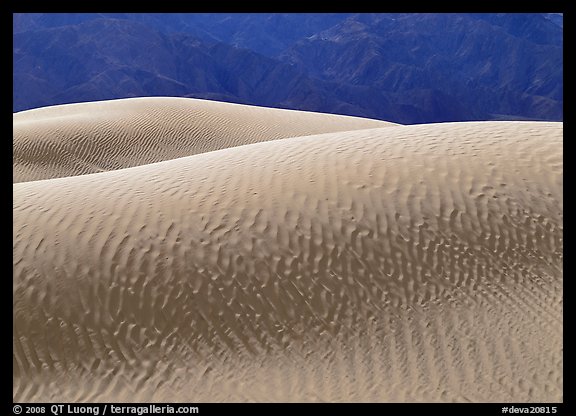
visited Death Valley. Growing up in France, I had never seen deserts
before. After standing on the highest point on the continent, I was
now at its lowest. The diversity of the natural world, and its
potential to draw parallels and contrasts has always inspired me. I
began to realize how interesting the National Parks system was, as a
whole.
I thrive looking for new experiences. After spending so much time in
the glacial atmosphere of steep high mountain faces, I was drawn to
the natural diversity offered by the National Parks, as I noticed that
each environment gave rise to distinct new emotions. They represented
all aspects of a vast continent with large tracts of wilderness: deserts and rain forests, Tropics and Arctic, soaring mountains and
pancake-flat areas where a pass is 4 foot above sea level. The
contrasts were endless compared to what I was used to in Europe, where
the last remnants of wilderness are found only in the mountains. Even
just the forests in California were a source of wonder, with the
tallest, largest and oldest trees in the world, whereas in Europe we
didn’t even have any virgin forest anymore.
Do you feel like you approach photography differently than you approached your research career? What I really mean is, does it “feel” different to you? Where you’re challenging a different part of your brain, exercising different creative muscles, etc, or have you simply traded one form of “researching” and “cataloging” for another one, with a different tool (camera) and a different focus (nature/national parks)?
The answer is probably in between. In the big picture of things, I think there is more similarity than differences, although they are not necessarily where one would expect. Your brain is wired in a certain way, and even if you express yourself through different unrelated media (for you that would be photography & writing. they certainly don’t go automatically together), it’s still you.
There are very different kind of scientists, as there are very different kind of photographers. From an intellectual point of view, the work that I was doing in science was trying to push the boundaries of knowledge in a minuscule area. Extreme depth, but a very little range. Eventually, I grew tired of such a specialization. In photography, I enjoyed being able to explore the world at large. I know it’s not optimal from a career point of view, but I don’t think I’ll narrow my range of subjects (and stylistic approaches) anytime. In the national parks project, I’ve explored nature in a very broad way: large vistas, intimate landscapes, close-ups, even micro-photographs of grains of sands (unpublished so far), even images about the idea of national parks. “Cataloging” was not a major component of my scientific activities. It is, as you’ve correctly identified, a component of the national parks project. This goes beyond places, including seasons as well. When I return to a park, I try not only new locations but also different seasons – which is why I’ve done so many park visits. I’d rather stay two days in three different seasons than a consecutive week. For some places (Yellowstone), the experience is so different it is like visit a different park. That gives me more chances to create different images.
One may think that aesthetics is a significant difference between scientific and artistic endeavors, but I don’t see it that way. There is an inherent beauty, elegance, and simplicity in all great scientific explanations, and even in computer code.
The main difference resides in the exploration of emotions, and the self. There is simply no place for those in science. It’s all about objectivity. Although my approach to photography has been somewhat “scientific” (like you’d say that of Eliot Porter and Bradford Washburn, two of my major influencers who both were involved with science for a large portion of their lives), those aspects have allowed me to exercise a different “creative muscle.”
I apologize for being mister “force the connections where maybe none exist…” but I keep being struck by what a “scientific” approach you take to your photography (in terms of the whole picture of your photo business, I mean). For instance, do you think your prolific writing about photography on your blog is tied to your academic/research background, and the requirements to write and publish, publish, publish? Or perhaps in general the methodical “index all the parks” approach is simply evidence of the same personality traits that perhaps led you to an initial career in the sciences anyway? After all, photography is one of the arts that most incorporates the science, right? Our darkrooms are little laboratories. At least they were back in the good ol’ days… My point, ultimately, is that I wonder just how much you feel your photographic approach has also been a fairly scientific endeavor?
There is a continuum of approaches to landscape photography that run from very intuitive (Sally Mann, Rinko Kawaushi) to a quasi-scientific approach (the Bechers, Burtynsky). As you’ve noticed it, I am leaning towards that end of the spectrum.
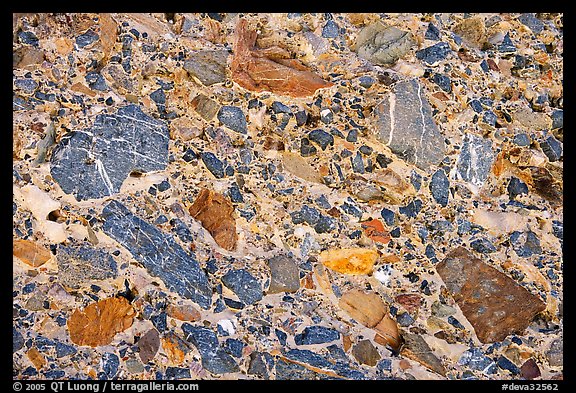
My photography is partly based on research. I try to gain a good understanding of the places where I work. My goal is not to make a pretty (or even “awesome”) picture. Instead I try to create photographs with some “interesting content”, that can reveal some truths and teach something about the world we live in. It happens that for the picture to work, it also needs to stand on its own esthetically. I look for inter-relations, and work in a systematic way. This rigor may not be readily apparent so far on terragalleria.com because I’ve not organized the work in series like you do for your own, but there are a number of underlying ones (try for instance “reflexions” in the search box for something a bit different).
Not to put too fine a point on it, but could you quantify the large format vs. DSLR captures you now make? 80/20 digital to film, or some other ratio (that was a stab in the dark)? What is it, then, that dictates why you decide to pull out the large format camera since, as you mentioned, we all know how well DSLRs make pictures now.
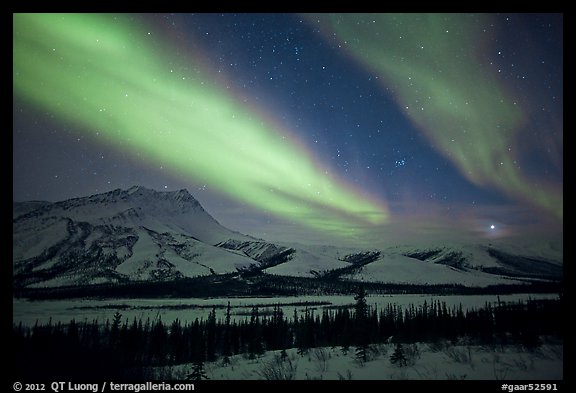
In 2012, it’s more like 99/1. It’s very fast to shoot a digital picture! The heavy bias is partly due to logistical considerations. When I traveled to Denali and Gates of Arctic this winter, I thought it would be too cold to fiddle with the view camera controls. The focus was also on northern lights, which require high ISO, so I packed only DSLRs. On my Colorado Plateau trip, I figured out that after shooting every night I’d be too tired at day.
Working in digital has extended the number of subjects and times of the day when I can work, but I don’t think it has changed the style much. When I was using the large format camera more, I was able to use it in positions (and expeditions) which would generally have required the use of 35mm, because my outdoors skills provided me with enough comfort.
I’ve been using 35mm to complement LF for a while. In the past, I pulled the LF each time I saw a potential for a fine print (because 35mm was marginal for that purpose). Nowadays, I do so almost only for all-encompassing landscapes. They also have to be significantly different from what I’ve photographed before in LF.
Let’s talk about your photographic style for a moment. First, do you think it’s changed much in your switch from large format to digital SLR? I wonder if you find your compositions in particular have changed due to the ease of getting that little camera into interesting positions-like shooting up at the Bristlecone pines in the after dark shot you referenced in your first message.
To understand why I prefer LF for wide-angle landscapes, see this blog post (almost a statement actually) which describes my approach for landscape work.
Why I keep using LF? On these images, the edge of LF is more apparent (DSLRs are excellent, but from what I’ve seen, it takes the Phase One IQ 180 to deliver the resolution of 5×7 film). I also try to maintain a continuity of this aspect of the project.
Although both are interrelated (the collection of wide-angle landscape is a “catalog” of natural environments), I see two angles in parks project. The first is about sharing a sense of place, emotions, and discovery through the large format fine print. The second is the typology, or “cataloging” as you put it. For the latter, there are so many images involved that using LF alone wouldn’t have been practical. Also, not all images lend themselves to a fine large print.
Was photographing in every national park a challenge you created arbitrarily? Or was it the natural consequence of wanting to exhaust absolutely every opportunity to experience, and photograph, that natural diversity?
I like to use best-of lists for many things. It makes easier to make decisions (in this case, where to go), help me discover things I wouldn’t have thought about otherwise, and at the same time focus explorations on areas that others have found worthwhile. The National Parks represent the list of the greatest natural sights in America as nominated by the Congress. It was also a practical list for me: the goal was attainable (the count is reasonable, the infrastructure excellent), yet the sites were varied enough to encompass something representative of all the nature of America. I also greatly admire the very idea of the National Parks, so I wanted to (modestly) help spread the word about them. I liked the fact if my images hopefully inspired folks to visit themselves, thanks to the NPS, that would be something that most would be able to do.
I said “experience and photograph” in the previous question, drawing a distinction between simply being in nature to enjoy it, and taking pictures of nature. I get the impression that your photographic pursuits really stem from wanting to be in nature as much as possible. As in, “hey, if my job requires that I go spend time in nature, then I’ll spend a whole lot of time in nature.” Pretty brilliant in its simplicity. Any truth here?
For many years during the national parks project, I was still working as a research scientist. On the job, I was sitting all day in front of a computer, dealing with mathematics and algorithms. Photography in the national parks provided a much-needed connection with the real world of nature, not only through seeing things but also being there, experiencing, like you said.
After I got married and started a family, it would have been difficult for me to justify all the time spent on photography and travel if this had remained a hobby. Indeed, One of the primary reasons I made the career change was so that my job would require me to spend time in nature (and other locales that interested me as well).
I’m sure people always ask “what’s your favorite park,” and if you’ve got something special to say about that, feel free. But I’m wondering what do you think should be OUR favorite park that maybe isn’t one of the “big name” parks? A hidden gem, if you will.
They are all very different (which makes a comparison difficult) but I’d say Yosemite. There are several objective factors:
intrinsic beauty (no need to elaborate there !), importance in history of National Parks, rock climbing, and photography, familiarity, and proximity. However, the most important may be sentimental.
After I had completed my PhD, I wanted to spend a couple of years in the USA, to see what this most powerful country was all about. At that time, I was an avid mountaineer and climber. I even had a government certification for guiding. As I didn’t know much about the geography of the USA, one of the few places I kept hearing about from other climbers was Yosemite – because of its high cliffs. At the beginning of 1993, I came to the University of California at Berkeley, since of all the top US research universities, it was the closest to Yosemite.
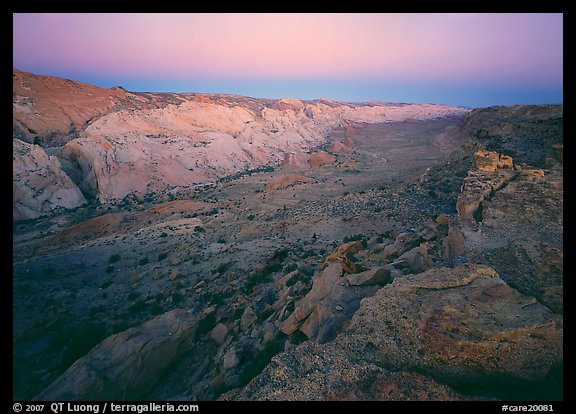
Hidden gem: Capitol Reef.
From the perspective of a European, the Colorado Plateau is the most unique region in the US. There is a single combination of spectacular geological formations, desert climate (which keeps the vegetation sparse so it doesn’t hide the geology), and great light.
Of all the Colorado Plateau Park, Capitol Reef offers one of the largest geological diversity. There are also so many opportunities for solitude and explorations since the paved road just scratches the surface.
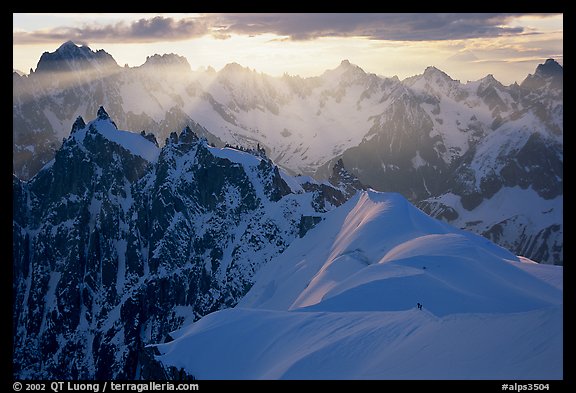
How about photographs you’ve made elsewhere, outside of the parks. Do you have any favorite photographic destinations that you love to return to? The alps, perhaps, just because of your origins? Somewhere else entirely, perhaps?
You guess it right. The Alps are the place where I first got seriously involved in the outdoors and photography. However, at that time, I knew much less about photography than now, so I always enjoy revisiting the place with more experienced eyes. I don’t think it’s possible to surpass the combination of spectacular high mountain scenery and ease of access. I haven’t traveled there as much as I would have liked too, though (only a couple of visits since I moved to California) because the parks project had eaten so much of my time. The somewhere else would have to be Vietnam, although so far I haven’t done any nature photography there, focussing on the culture instead. If I want to rejuvenate myself, I prefer nature to cities. Asia is very crowded, but there is something there that strikes a chord in me.
How about documenting the natural world vs. making artistic interpretations of what you saw. Do you have any strong feelings either way on this spectrum from “fact” to “art”?
I am very interested in facts. However, intellectual interest alone wouldn’t have been enough to sustain the project. When you think about it, nature photography is tough work, no matter you put it. Some of my relatives don’t understand why I left the comfort of an office – and a salary. To do that work, I had to be driven by love for the subject – in this case, nature. Facts are about trying to understand the natural world. They are important because deeper love stems from understanding, but eventually, it is love that matters the most. This is where the “conservation” part of the effort comes into play. I’m trying to help the viewer feel the same emotional response as I felt myself when I experienced the land. This goes beyond just facts. I am hoping that they will feel moved enough to care for the natural world and want to help preserve it. To elicit the emotional response is the “artistic” component. I’m trying to teach and delight at the same time. Both are equally important.
One more! I almost forgot to ask you explicitly about
Yosemite. (Though I think ultimately the text will emphasize your work
in the parks as a whole, rather than Yosemite in particular-even if
the illustrations lean heavily on Yosemite.) As you mentioned in your
email to Chris, so much has been done there. Does that make it a
particular challenge to photograph there, or is it as simple as trying
to find the off-the-beaten path spots? Is it up there in your list of
favorite parks? Or perhaps you have favorite places, both popular and
hidden, that you wouldn’t mind talking about?
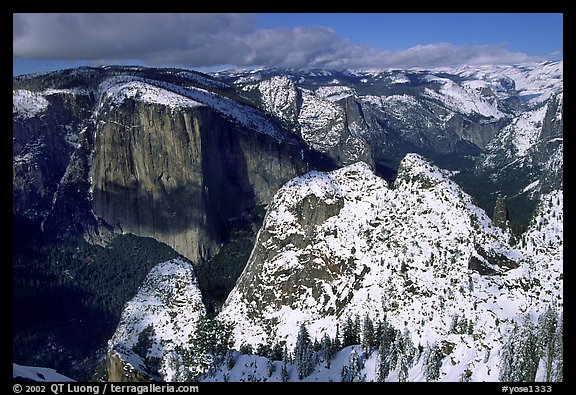
Yosemite is my favorite park. I actually like the fact that some many great photographs have been made there before. Rather than hindering me, this creates a benchmark against which I can measure my images and progress, and see if I can do something new there.
A lot of photographers do not go beyond the established trails and
overlooks. Those overlooks concentrate all the photographic activity
taking place in the area. Often to find new perspectives, it is just a
matter of walking a short distance from the designated viewpoints. For
example, my
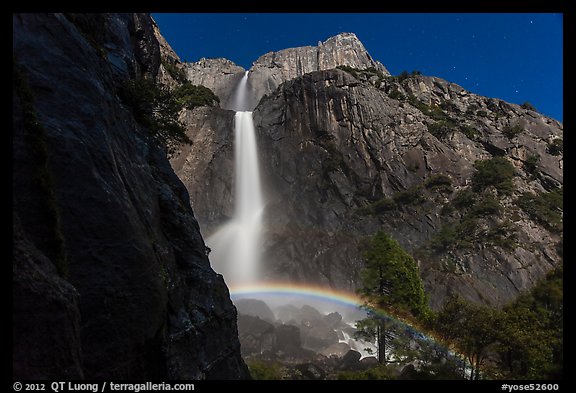
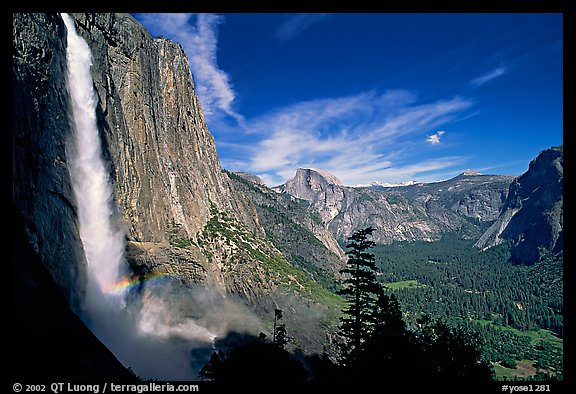
nighttime Lower Yosemite Falls image where you see Upper Yosemite Falls above, isn’t commonly shot nowadays despite an unusual alignment, but it is only about a 10-minute walk from the bridge where most shoot. Carlton Watkins photographed many times from that particular viewpoint. I assume that during the 19th century there was no paved trail and bridge, and therefore, he would roam all around the place and happen naturally over this excellent view.
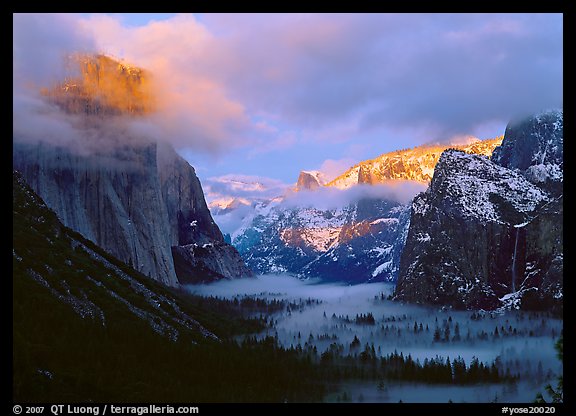
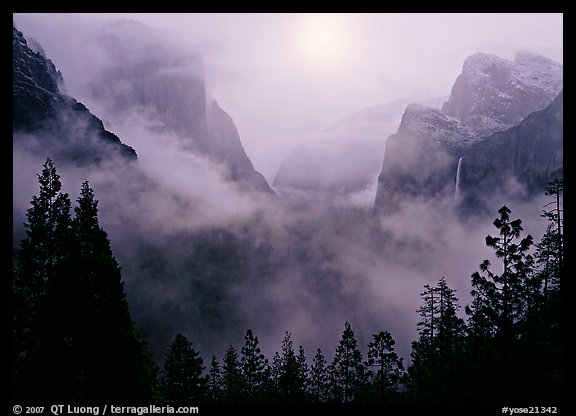
Even an extremely well-trodden viewpoint can yield new (as far as nature landscape photography is concerned) images as the weather and light changes. As an extreme example, consider my Winter Sunset image made at Tunnel view. Adams himself photographed many times from this viewpoint, as he felt that it would yield different images. Series of views in differing conditions can be found in his book “American Wilderness” and the centennial retrospective. No matter how hard I looked, I could not find a viewpoint that captured the “essence” of the Valley better, so it has become a favorite of mine. I felt that Adams “owned” the view so much that I consider most of my images made there an homage, something that Adams would do, with a bit of color (superficially) added. Usually, I seek to photograph something I haven’t photographed before, but in this case, I sought to a photograph that Adams hasn’t made before, yet using of his most often repeated composition. There is something missing in Adams series, and that is color – which I think is an essential component for setting up mood and atmosphere. So I sought to make a photograph in which color would be an integral part, one which would not work if it was B&W. This meant color contrast. Since the Yosemite granite walls are gray, the most color contrast would be found at sunset between the yellow/orange illuminated cliff tops and the valley bottom, which would turn blue because of the open shade conditions. Most evenings, the valley bottom would be too dark, but if there were some fog in the bottom, that would lighten it up, and enhance the blue tint. One evening, as I was in the Valley, I noticed the fog forming and a hole in the western horizon. I rushed to Tunnel View, and here was the image, almost a decade and maybe a hundred visits after my initial one.
Another classic location that I particularly like is El Capitan meadows. Unlike Tunnel View, the number of possible compositions there is limitless. Here is a
write-up.
If one is willing to hike for one or two hours, there are quite a few possibilities. I particularly like the view of Upper Yosemite Falls from the trail with Half-Dome in the background, as it captures together the two main features of the Valley
Here are some of the out of the beaten path favorites:
Ribbon
Fall
and
Fern
Ledge.
Okay, one more quickie question has just occurred to me as I’ve
been digging in to your images for the past few hours. You’ve got a
real knack for finding new views and unique takes on heavily
photographed places. Obviously it’s a skill you have (part of your
“eye” I suppose) but I wonder how much it has been shaped by the
“10,000 hours” principle. Meaning, not only have you spent plenty of
time photographing, and exposed a lot of film… but by virtue of
traveling to all of the parks, you kind of literally have seen it all
and been everywhere. And I wonder if simply having been everywhere
means you’re that much less likely to settle for the same old
shots. If I’ve never been to Yosemite, I’ll settle for any great
shot. If you’ve spent dozens of days or weeks there, you really need
to push yourself if you’re going to satisfy yourself, I assume. Am I
on to something here? How do you think your vast experience enables
you to not only find unseen areas in popular parks, but find unique
angles on the most popular places in those popular parks?
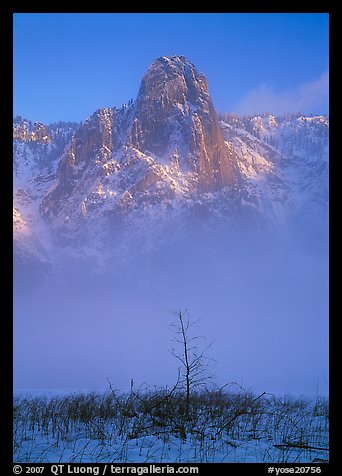
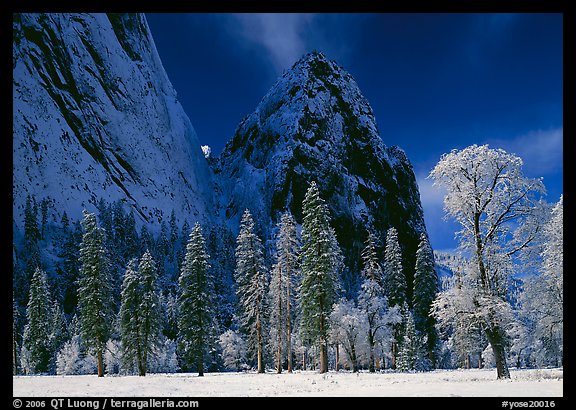
Right. In fact, it took me several years of working in Yosemite before I created images I was happy with, and the two of Cathedral Rocks that you picked were part of this session.
To complement the point you are making, I’d add that my vast experience includes shooting “icons.” Unlike some, I do not eschew them. Although they are iconic because of the ease of access, there are often other good reasons for them to reach that status, and it’s something I want to find out for myself. Even if the images are too derivative to stand on their own, they can help tell a story in conjunction with other images – not to mention generate a few stock sales. But to me, the most important reason for shooting those “same old shots” is that once I’ve done them, I can move on.
I’m constantly trying to create photographs that I haven’t made before. To me, this seems more natural than always trying to create photographs that haven’t been made before at all. Since I already have the “same old shots”, then when I come back, I’ll look for something different. Therefore indeed, if you spend enough time to get to know a subject, you’ll do something more original, without needing to be a particularly original person yourself.
I was thinking about the winter sunset at tunnel view photo, and wondering about your reaction to first seeing the scene in real life (or seeing your photograph of it). Even though we’ve spoken about a sort of “scientific” approach of wanting to document a place, share the experience for others, and simply show nature in all of its natural, unadorned beauty… I wonder if gorgeous scenes like this still take your breath away. What I mean is, you’ve seen all the parks, made many wonderful photographs of places grand and small, and so I wonder if it takes more to impress you. You’ve got a higher standard, perhaps. Anyway, what was that moment like–either seeing the scene unfold before you, or seeing the finished photograph. Is it a heart-pounder? A special sort of thrill? Any other images in your portfolio that provided you with a similar thrill?
In February 1993 (one month after arriving in the US), I went on my first trip to Yosemite with the Cal Hiking And Outdoor Society (CHAOS), which is the a student club of UC Berkeley. We arrived by night on Friday. On Saturday morning, I awoke to see impressive cliffs, but the weather was not nice, and we didn’t spend much time in
the Valley. Instead, we promptly drove to Badger Pass, at a higher elevation, to start a backcountry ski trip with snow-camping near the rim in iffy weather. Upon completion of the trip, we drove back to the Valley, passing again through the Wawona Tunnel. As we exited the tunnel, the storm cleared, and a rainbow appeared over the Valley, prompting us to stop and take in the scenery at Tunnel View (we hadn’t stopped there on our way to Badger Pass). Although I had seen the Valley from its floor, and then from the rim, that was the first time I saw this view.
At that time, I didn’t know how classic it was, but it made me realize immediately how special Yosemite is. It was a thrilling moment, how the other thing that I understood right away, is that the picture I took didn’t do it justice (I’ve never published it). This set me on a long quest to make a more satisfying image, to which I added the color requirement after seeing the Adams series. I’ve often driven into the Valley through the Wawona Tunnel (I have friends in Yosemite West). Although there is nothing like your first sight, the view still never failed to impress me, even when the light wasn’t particularly good – and I didn’t stop to take a picture. So when I made the “Winter Sunset” photo, I was doubly thrilled, first by the view, second by the image I was anticipating. I set up in a mad rush, thinking the light might change at any instant. In fact, it lasted maybe a good ten minutes, which left me time double check the camera settings after exposing the first pair of images. I was viscerally excited during the drive home.
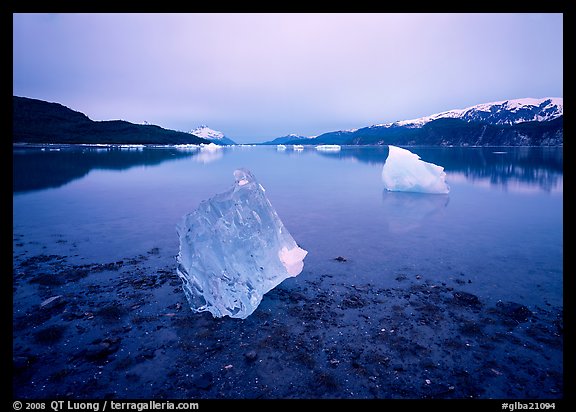
I still get very excited when I come to a new, spectacular view, especially when seeing it for the first time. The first image I ever made of an iceberg is still my favorite. But even if I’ve seen it before, if the light redefines it in a new way, the excitement is anew.
And secondly, do you mind providing me with a basic list of your preferred cameras and lenses? You can include as much or as little as you like. Our manufacturer advertisers like seeing their names in print!
Canon EOS 5Dmk3, 24-105mm f/4L IS, 24 TSE II
Canham KBC 5×7, Schneider Super Symmar XL 110mm f/5.6
Those lenses account for more than 50% of images made in their respective formats. I’ve seven 5×7 lenses and about two dozen Canon lenses, but none of them is “indispensable” compared to those listed above.
I know you finished the “National Parks project” proper back in 2002, but is it fair to say that you still continue to photograph in the national parks? Is it something you still do regularly? Basically, I’ve framed it as the “project” took ten years, but for another ten you’ve continued photographing America’s wilderness in the National Parks. Fair, or no?
Photographing in the National Parks is still a priority. Although it is not that clear cut, in the first ten years, my goal was mostly to create representative images of each park in large format. In the last ten years, it has gradually shifted to try to create a comprehensive record of each park.