Under-Over Water Split Shots: Challenges and Solutions
5 Comments
http://www.terragalleria.com/blog/under-over-water-split-shots-challenges-and-solutions
Under-over split shots are some of the most technically difficult photographs I have attempted. In this piece, I review the challenges and solutions behind my latest attempt on Ofu Island in American Samoa, including even an instructive experiment with AI. If you are curious about everything that goes on behind those types of photographs or are thinking of trying your own, read on!
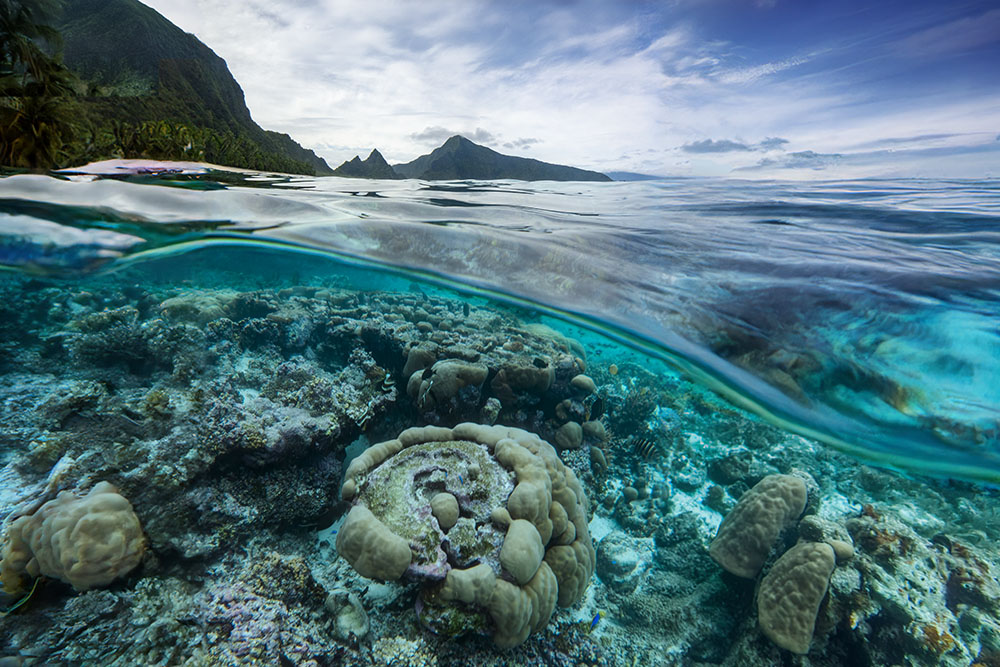
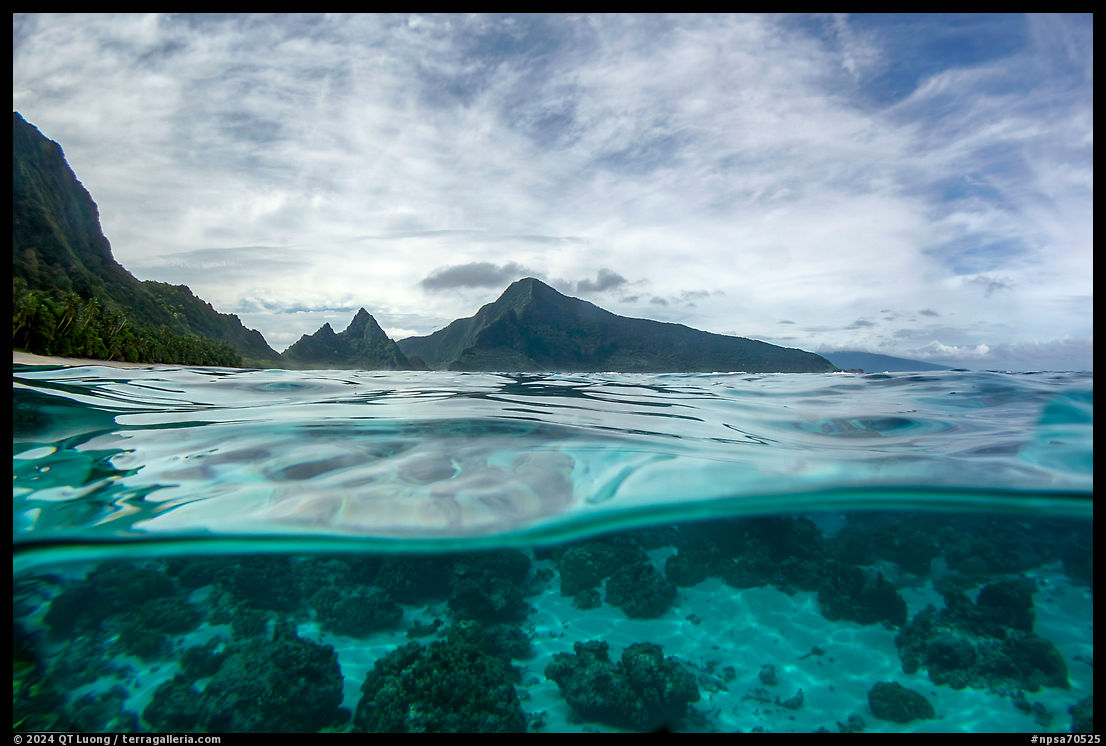
Under/over water split images capture the underwater and above-water scenes in a single frame, almost always with a super-wide angle lens. They offer a unique perspective, showcasing the contrast and connection between the aquatic world below and the terrestrial world above. One of the main goals of my trip to Ofu Island was to make such photographs including the reef, which is more demanding than a split image with a shallow sandy bottom where you can stand or sit.
If you have not tried to take photos underwater, it is difficult to appreciate how difficult that is. You are swimming or diving and have to prioritize staying alive. Using underwater camera housings adds complexity, while setting the correct exposure and focus is more intricate due to the unique lighting and refractive properties of water. The constant motion from water currents and waves makes maintaining stability difficult. Visibility is often compromised by particles and sediment. Making a split shot combines the requirements of underwater photography with those of landscape photography. Both the underwater and topside parts of the image need to be interesting, well-exposed, and in focus.
In addition, one has to position the waterline separating the underwater and overwater parts, which is a key to the composition. Placing it roughly in the middle of the image doesn’t present a difficulty in flat water. However, even in a relatively calm lagoon, small waves transform that placement into a serious challenge. The smaller the front element of the lens, the more difficult it is to capture an adequately positioned waterline.
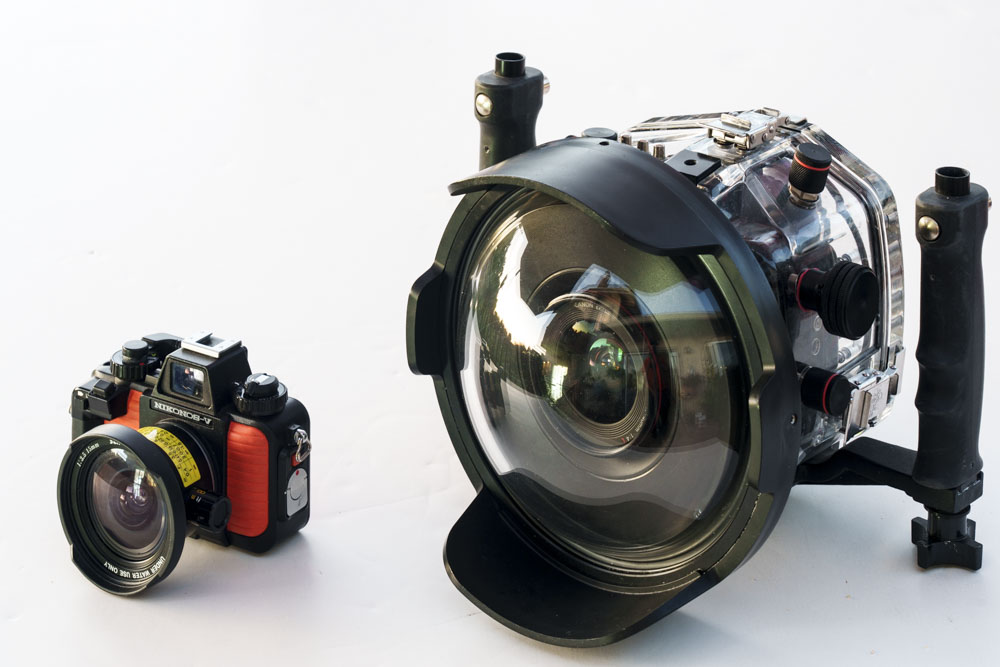
Left: Nikonos V with 15mm lens; Right: Ikelite housing for Canon 5D2 with dome port for 17-40mm lens
During my 2002 visit to Ofu, my underwater camera was the storied Nikonos V. The last in a line of cameras originally designed by Jacques-Yves Cousteau, the Nikonos was the gold standard for 35mm amphibious cameras – that could be used on land or underwater without an additional waterproof housing. Besides being the underwater photography system of reference for decades, Nikonos cameras were also workhorse cameras for Vietnam War photographers. Moving to digital photography, I miss the bombproof construction, compactness (see picture above), ease of use, and extremely sharp optics. The front element of the lens was in direct contact with the water, producing images with a corner-to-corner sharpness and color rendition that is unmatched to this day by any camera placed in a housing. However, despite its versatility, the Nikonos was not the right tool for photographing split images. The front element of the 15mm lens was quite small, measuring about 2 inches. The film had to be advanced manually one frame at a time, which made capturing the waterline at the right position a low-yield endeavor.
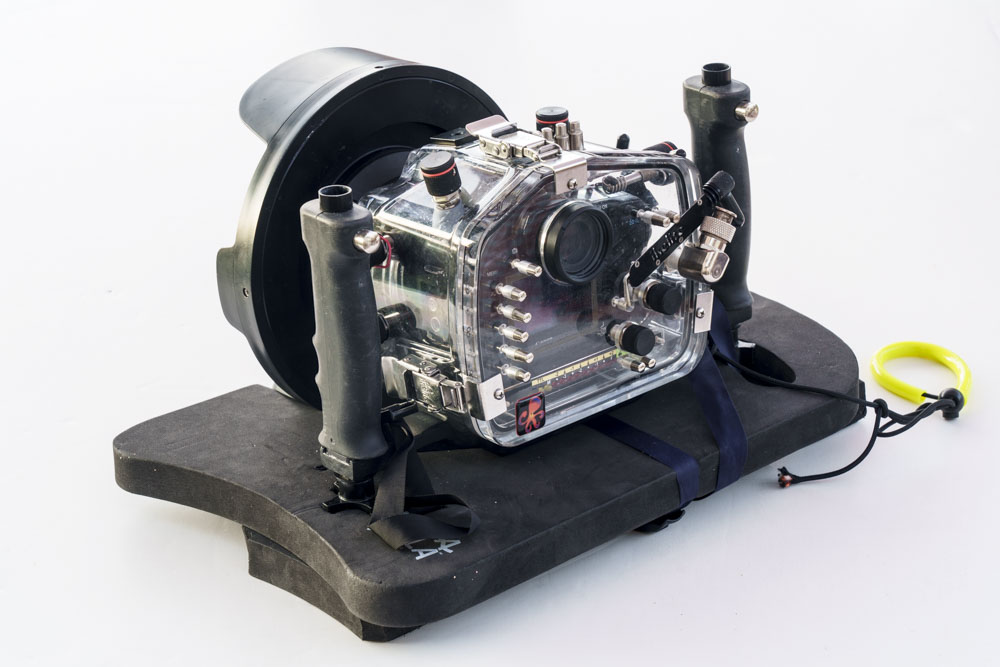
This time, I came with a DSLR camera in waterproof housing. The cost of the housing, although a low-end Ikelite design, is roughly the same as the camera, and it fits only a specific model. For this reason, I was still using a Canon 5D Mark 2 with the 17-40mm lens. The front of the housing is called the port, and for wide-angle photography, it needs to be curved like a dome, hence it is a “dome port”. Ports are interchangeable as they have to be carefully matched to the lens. A larger port makes it easier to position the waterline and also leads to a thinner, cleaner image of it. With that respect, my 8-inch diameter dome port was certainly an improvement over the Nikonos. I still wished I had an even larger one for ease of waterline positioning and improved depth of field. Still, larger dome ports are massive, especially for travel, and too buoyant for underwater photography at any depth. Being designed for scuba diving, the Ikelite’s buoyancy is neutral, so when on the surface, the dome port is mostly submerged. To position the waterline in its middle, one needs to raise and hold the housing, which can be tiring since it weighs 14 lbs with the camera and lens. I remedied this situation by building a custom floater with a buoyancy calibrated by removing material from two swimming kickboards to place the waterline right at the middle of the dome port.
The waves were too unpredictable to foresee their movements, but with the DSLR, I could just keep shooting in bursts and hope for a good split. Jon Cornforth mentioned shooting a few thousand images in Ofu and deleting most of them. However, when a larger wave washes over the dome, it leaves droplets and water beads that ruin subsequent photos. Keeping the large surface of an 8-inch dome free of them was a new challenge. One can try to keep the dome dry after wiping it with a towel. With that in mind, I had brought two inflatables to experiment with. One can try to completely repel the water from the top of the dome by coating it with waxing products like clear car polish, Rain-X, or Jet-Dry (spot remover used in dishwashers). While this is said to work well with a glass dome, those products can damage acrylic domes. The alternative approach that I used is to create a thin, even film of water over the top of the dome, using Sea Drops Anti-Fog, or simple saliva. This is done in conjunction with dunking the dome quickly to get rid of droplets and swiftly pressing the shutter before beads can form. Reviewing the images on the back LCD, I thought that this technique worked well and that I also had a high success rate with the waterline placement.
In addition to those physical difficulties, there are also photographic technical challenges. The relatively easy ones are exposure and shutter speed. The underwater part of the image is darker than the part over water. A one-shot solution, preferable because of wave motion, is to use a graduated neutral density filter (GND), which has to be of the screw-on type because there is no space in a housing for a square filter holder. However, it limits the placement of the waterline and precludes switching from a horizontal to a vertical composition. Although to handle the difference some photographers use a 4-stop GND, I found that the dynamic range of digital cameras makes a 2-stop GND generally sufficient at midday. I brought an underwater strobe to light up the reef in lower illumination conditions, but it adds another level of complexity. Because while making the images you are floating in moving water, a fast shutter speed, at least 1/100s, although 1/200 is safer, is necessary. However, when shooting through a dome you also need to stop down the lens for uniform sharpness and depth of field (as explained next), hence even at midday, the range of usable ISO starts at 400.
The more difficult challenge is the depth of field. Above water, the dome port has no special optical properties; it works like a clear window. When used in a housing, the lens has air in front of it and air in front of the port, so there is no difference in the medium. However, underwater, the dynamics change. With air in front of the lens but water in front of the port, the dome port functions like the rear element of a giant lens made of the sea. Therefore, what the camera captures underwater is a virtual diffracted image. That is why objects appear closer underwater than above water. Roughly speaking, the virtual image is located at a distance from the lens equal to twice the dome’s diameter. For my 8-inch dome, it means that objects at infinity underwater are imaged about 16 inches from the lens, with the focusing distance for closer objects even shorter. Most people focus on the underwater part of the image, relying on depth of field to take care of the above-water part. However, even stopping down to the maximum may not be enough. When I examined larger versions of single-frame split images, I noticed that in single captures, the above-water portions were always slightly soft. Therefore, like Floris van Breugel, I planned to rely on focus bracketing and stitch two pictures taken at different focus settings. However, because of the current, I could not make the two frames from the same spot.
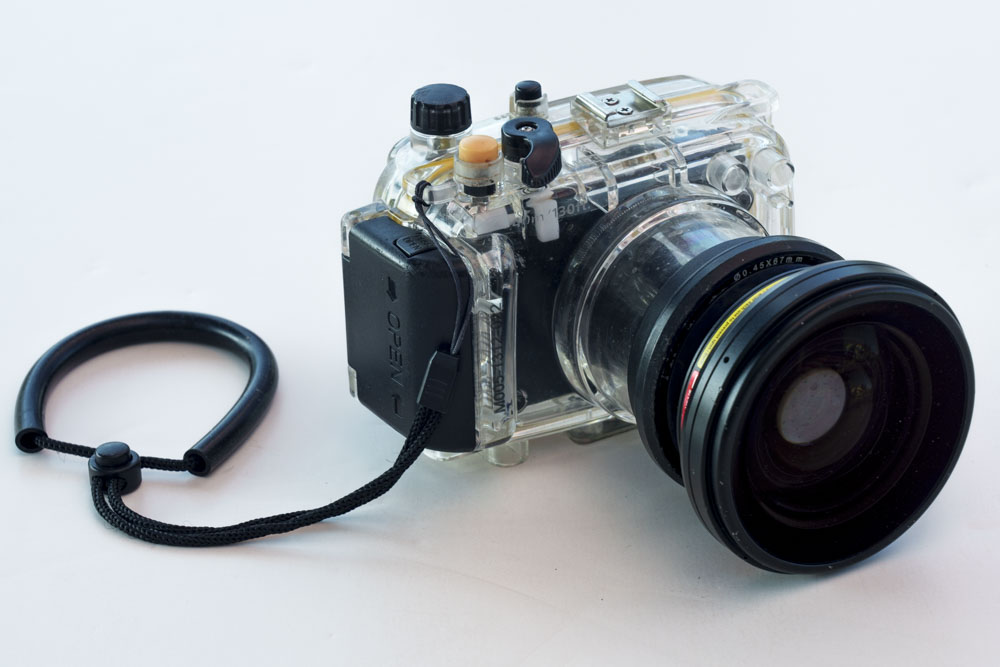
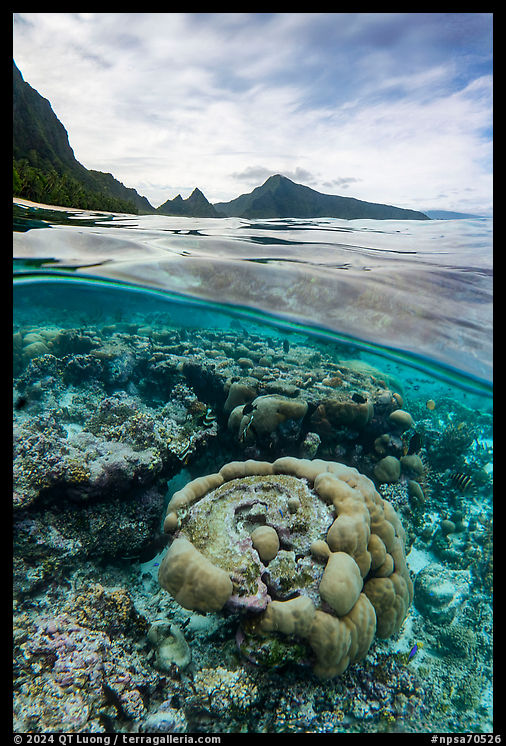
As told in my travel story, I flooded my housing and ruined the DSLR camera, destroying the hard-earned and promising pictures. Fortunately, I had brought two backup compact underwater cameras. My best one was the Sony RX100 in a Meikon housing with the screw-on Inon UWL-H100 wet lens that converts 28mm, the widest focal length of the RX100, to a 16mm suited for photographing split shots. Only slightly bulkier than the Nikonos, the combination provides maybe the best digital underwater image quality possible in a package of this small size, even though the limits of the 1-inch sensor begin to show up at ISO 400 – will someone make an underwater housing for the Ricoh GR? However, its front element is a smallish 3 inches, making placement of the waterline difficult. By using the focus bracketing technique, the best composition including the iconic Sunuitao Peak I was able to make is the photograph below, where the waterline is lower than I wished. It is a composite of two almost identical images, except for the focus point.
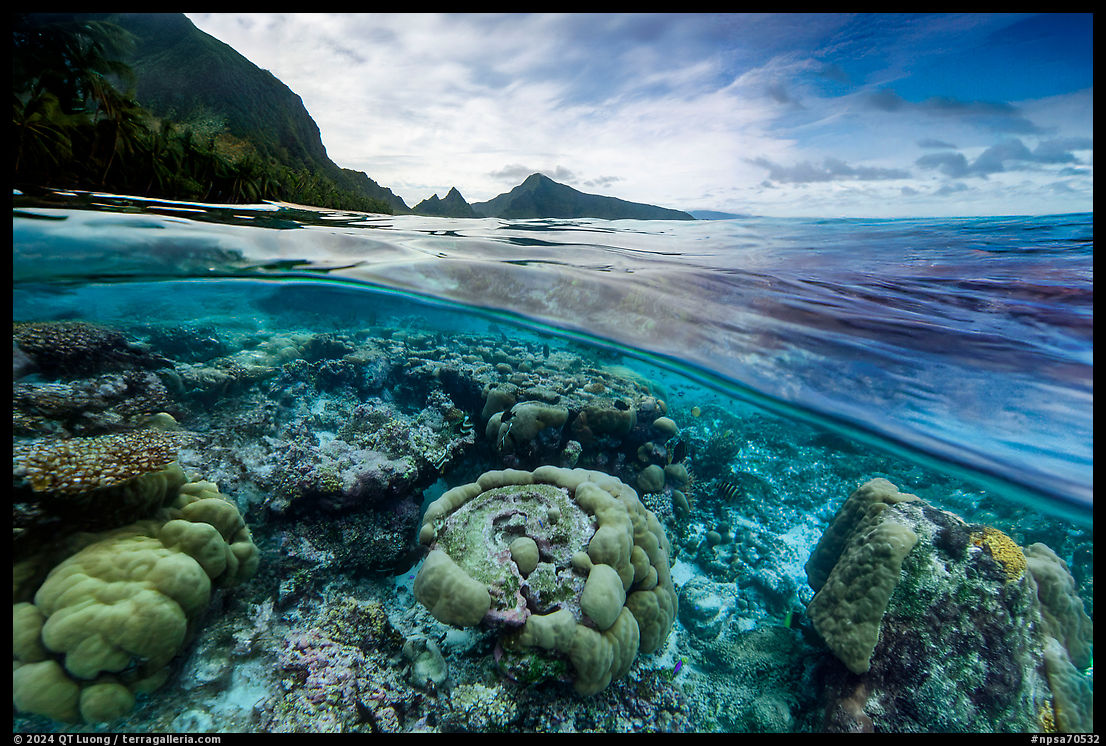
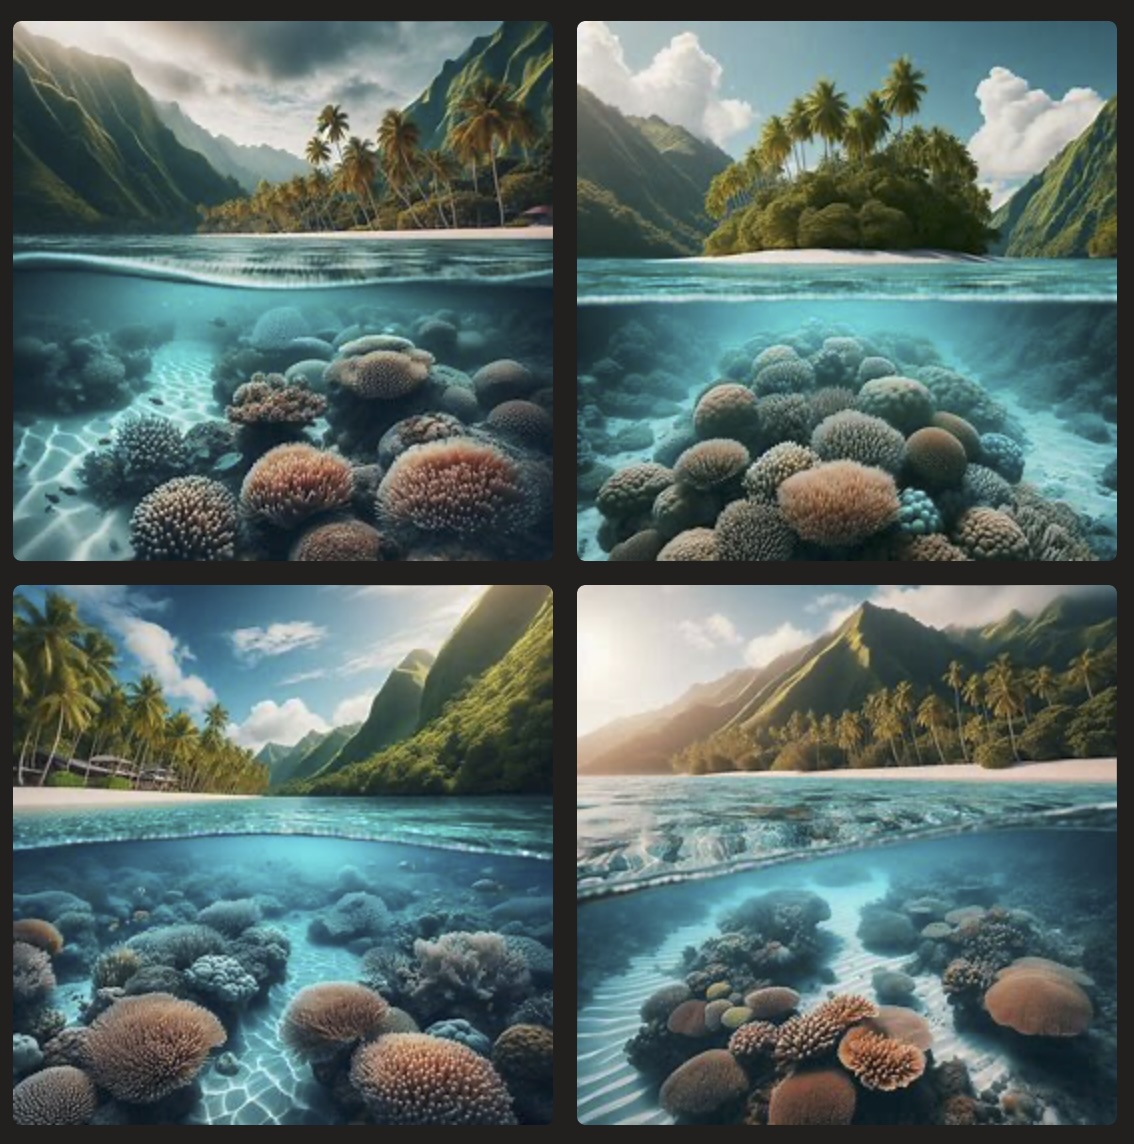
Recognizing the improbability of composing a great split image with that rig, I also proceeded to photograph a series of images with a neat waterline low in the frame, and a series of underwater images from a few inches below the surface, to be used as material for a composite image. Although the reef had an amazing diversity of corals, the most striking features were huge coral heads almost the size of a small car. If I framed the underwater image horizontally, the composite would have a square aspect ratio, so I preferred to frame the underwater vertically, resulting in a vertical composite with an overall higher resolution. Unlike the previous photograph, which I have kept close to the original file, I color-corrected the underwater part to restore some of the vibrance lost when the white balance is set for the landscape. Since they are an assemblage of different compositions unlike the composite images from focus bracketing, I clearly caption them with the word “composite”, an extreme rarity in my archive.
Generative AI is not part of my practice, however, I like to keep up to date with current technologies out of curiosity. To generate a horizontal image, I tried Adobe Firefly AI Image Extender in the Photoshop Beta release 25.10. As you click and drag beyond the borders of your image, generative AI quickly fills the space with contents that blend with the existing image. Although it took many iterations to give the mountain a plausible look, Adobe Firefly easily provided plausible renditions of the reef. I picked one that including coral species I remembered seeing in Ofu. With a final aspect ratio of 2:3, more than 55% of the image is AI-generated. I was impressed enough by the result that I even published one of those images, the first (partly) AI-generated image in my archive. I marked it as such in the caption. The opening image is one of the variations, and of course, the central portion is unchanged.
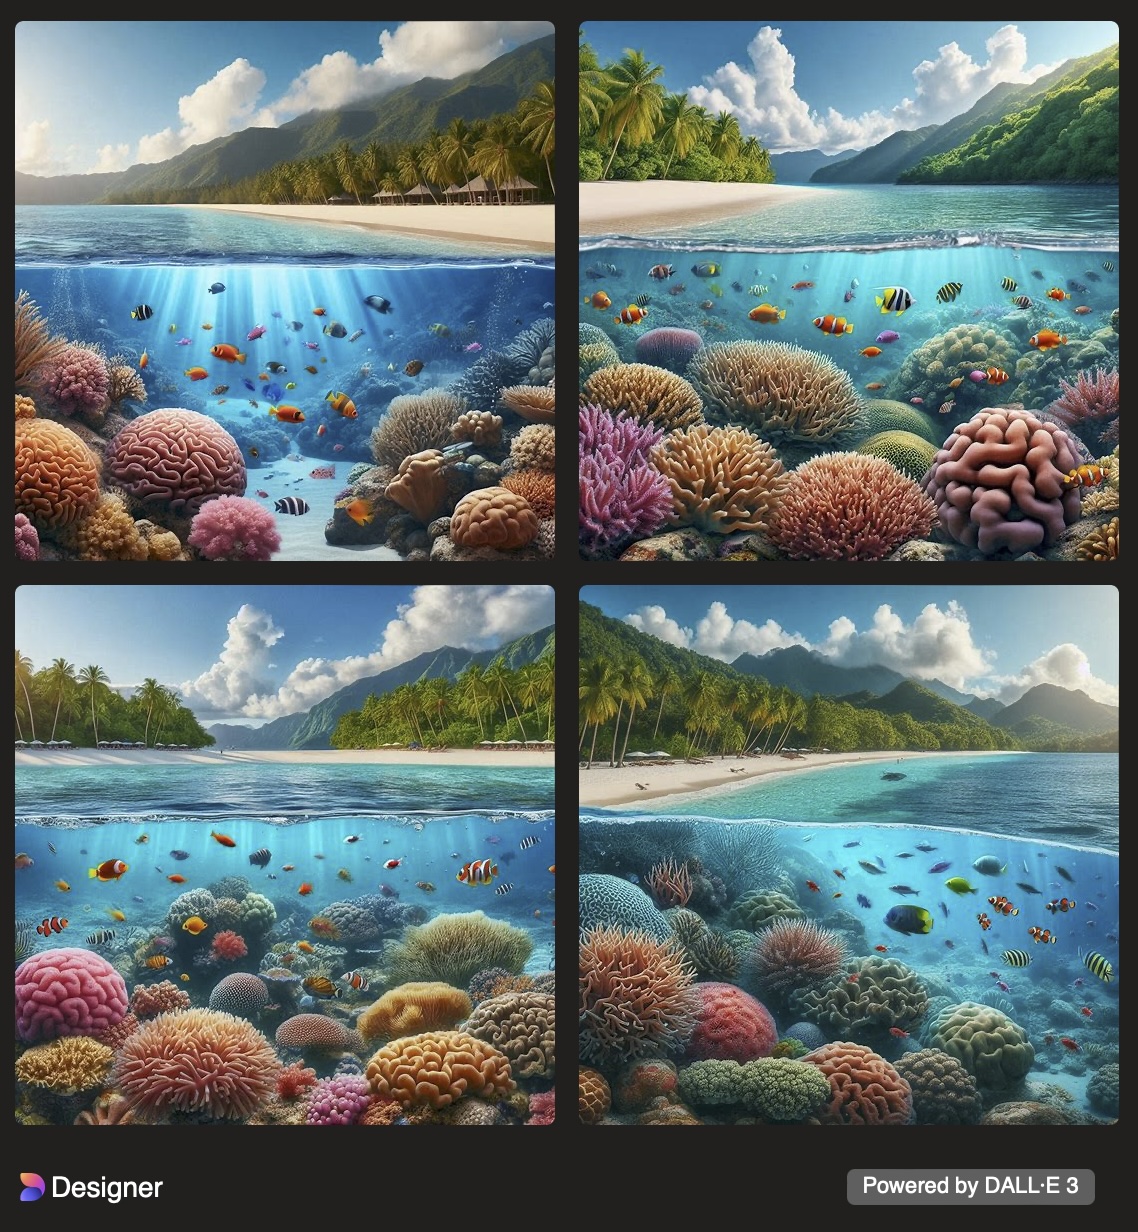
Since those AI images were so realistic, maybe it was unnecessary to travel to Ofu if the goal was just pictures, as you could try to generate 100% of the image by AI. OpenAI’s DALL-E 2 made a big splash as the first mainstream AI image generator and has been superseded by the more advanced DALL-E 3 offered as part of a ChatGPT Plus subscription ($20 per month as of this writing). There is a simple way to use it for free: it is the model that powers the lesser-known Microsoft Designer’s Image Creator. The first series was obtained with a direct prompt and the second with a ChatGPT-generated prompt, a bit of an improvement. I am no “prompt engineer”, so I am curious if anybody can do better. Those examples would indicate that AI still has a long way to go to produce an image from scratch even vaguely resembling a specific place – or even any place, as they all look quite artificial to my eye. It could be that Ofu Island is as much a challenge to AI image generators as it is to travelers. The scarcity of images available for training compared to well-trodden destinations must have been a factor, but that is what makes a visit to Ofu particularly rewarding.
Since this is still new, I am interested in your attitude towards generative AI. Have you created any AI-generated images, and would you publish them? If you do not see the two questions in the poll below, click here.
Part 5 of 5: 1 | 2 | 3 | 4 | 5


Your waterline photos are beautiful. I can see a book there. — Robert
Thanks, Robert. That indeed would be a compelling book that to the best of my knowledge has been done – Asako Narahashi’s work is of a different nature. I am not sure I am the person to do it, though, as water, and especially cold water required to make that project complete, is not my natural element.
Hi
I have also been experimenting with underwater split shots without success. I have an Ikelite with an 8″ dome for my Sony Alpha camera. It is as you say extremely challenging. I’ve been using a fisheye lens and some sort of acrylic windshield cleaner for aircraft to avoid the water drop issue. Three sessions without success yet. My camera doesn’t have automatic focus bracketing but it is an excellent idea.
Good luck!
All you need is two frames stopped down, one focused on the landscape, and one focused underwater. I have the lens pre-focused at infinity and the AF point(s) underwater. I take the landscape-focused photo, press on the AF-on button, take the underwater-focused photo. It’s a very quick sequence of action.
As mentioned in my A7R5 review, the automatic focus bracketing would results in extraneous frames and works only at 2.5 frames per second, so I would probably be slower!
QT Long:
Having been to South Pacific islands before really defines oppressive heat which is scaled to age. The older the harder.I appreciate your travels and travails.In my experience,when the surf is up all commerce stops.You paint a great travelog that I wish My family could watch on Youtube or Vimeo.Not all people can look up at night and see the stars and the southern cross.
Great adventure.
Rubaloff