https://www.terragalleria.com/blog/twenty-years-of-printing-with-the-epson-9800
In a world where digital photography devices are often outdated within years, how likely is it to be using the same printer for two decades? Since 2005, my Epson 9800 has faithfully translated pixels into tangible art and is still strong. Besides providing a practical account of my long-term experience with a particular printer that can be applied to other devices, this article surveys the history of digital printing and discusses the benefits of making prints yourself.

Early digital printing
When I sold my first prints in 1994, fine-art digital printing was virtually nonexistent. Those color prints were made using the Cibachrome process with a traditional optical enlarger. The contrast color transparencies (5×7 inch slides) exceeded what the paper could reproduce, so the better labs produced a contrast mask – essentially a black-and-white negative of the image. When sandwiched with the transparency, its darkest parts corresponded to highlights and tamed them.
In 1996, Cymbolic Sciences introduced the LightJet, a digital printer that takes a file as input. It used photographic, silver-based, type-C paper for printing from negatives and RA-4 chemistry. The image is created by exposing the paper pixel by pixel with RGB lasers. As each pixel has a continuous RGB value, the resulting prints look exactly like traditionally made color photographs. The preferred medium was Fuji Crystal Archive, which came in three varieties, Semi-Gloss, Glossy, and Super-Glossy. It has the best longevity rating of any color photographic paper, 60 years. The previously most durable color photographic paper, Cibachrome, had a longevity rating of 35 years.
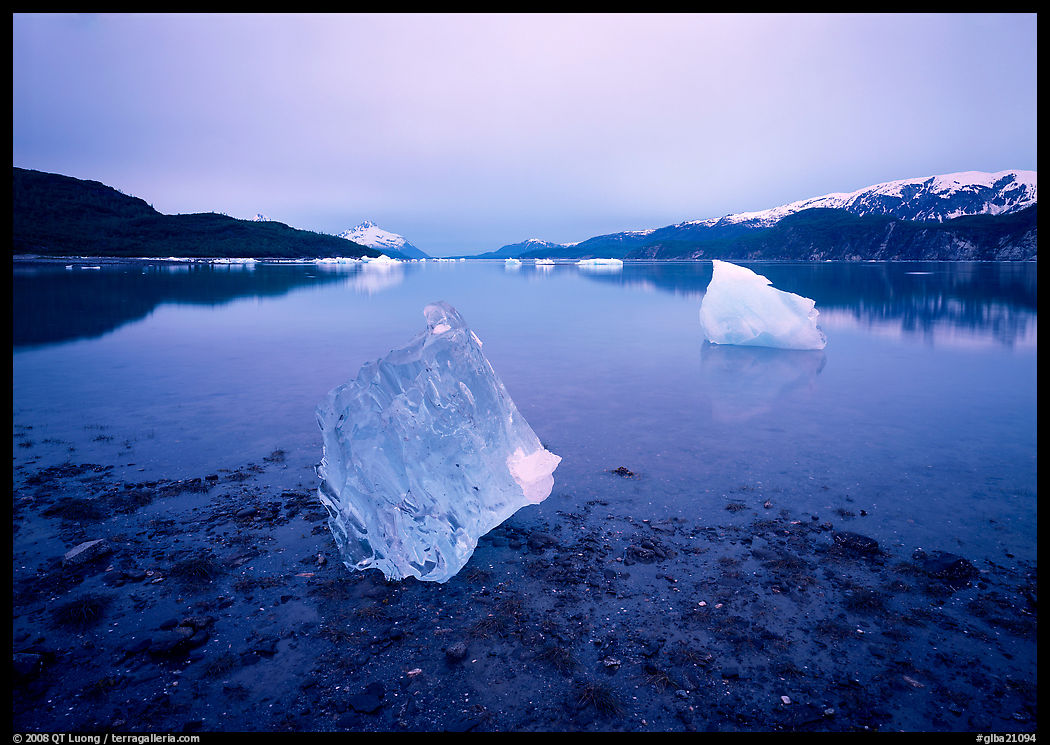
That year, I switched to LightJet printing. The image below shows the first LightJet prints I had made. The LightJet printers, joined by the similar laser chromogenic Durst Lambda and the ZDE Chromira are still in use. The Lambba is a more efficient printer, however, from the samples I have seen, the prints are not as sharp as the LighJet’s. Both of those printers use lasers and cost about $200,000. The Chromira uses LCDs, and costs “only” around $60,000. The prints are on par with the Lightjet. Because of the costs, maintenance, and size requirements, those printers are exclusively operated by labs, such as Calypso Imaging in Santa Clara then Santa Cruz, and West Coast Imaging in Oakhurst, both of which produced my prints for almost a decade. While picking up prints at Calypso, it was not uncommon to run upon some of the finest photographers in the area, people like Frans Lanting, Charles Cramer, or Bill Atkinson.

Early inkjet printing
Inkjet printers lay very fine droplets of ink on paper. Colors are formed by the juxtaposition of droplets of several primary colors. The first inkjet printers to produce high-quality output were the Iris printers that appeared in the mid-1980s. An Iris works by squirting a million droplets of ink from each of its four nozzles (Cyan, Magenta, Yellow, and Black) every second towards a drum rotating at a speed of 150 inches per second. These droplets are given an electric charge to determine which should hit the drum, and which should be deflected to the waste system. Papers are typically fine watercolor papers or canvas. The term Giclee (a French word meaning “to spray”, although in slang the verb “gicler” has a different meaning) was coined in 1991 by printmaker Jack Duganne to refer to Iris prints. Nowadays it refers to any inkjet print on fine art paper. Iris printers were expensive and required meticulous care. The drum size limited the print size. They used dye-based inks that yielded vivid color and dense blacks but were not archival. Iris printers played a pivotal role in the early days of the digital fine art printing, however, they have been surpassed by nozzle-based inkjets in nearly every technical aspect.
The common inkjet printers are nozzle-based. Tiny nozzles spray ink droplets directly onto the paper. The nozzles are part of a printhead that moves across the media to build the image line by line as the paper scrolls in the other direction. Photographic inkjet printing emerged in the late 1990s. Using more types of ink than the four basic primaries, high-end photographic inkjet printers are a world apart from cheap office printers. They produce prints of remarkable appearance. However, early prints suffered from flaws that made them unsuitable for selling as artwork. Pigment-based inks are considerably more stable than dye-based inks, which produced prints that sometimes faded within a few years. However, the range of colors that can be reproduced (color gamut) was much reduced. They also suffered from serious metamerism – colors shift when viewed under different light conditions. A print that looked perfect in your studio under 5000K lighting, when viewed under more common tungsten or halogen lights would take an ugly magenta cast.

Epson revolutionizes fine-art printing
In 2002, Epson was the first to crack the inkjet fine-art printing nut with their “Ultrachrome” pigmented inks introduced in the 7600 and 9600 wide-format printers, which at last offered a combination of vivid color and reduced metamerism. Based on accelerated fading tests, longevity exceeded the Crystal Archive papers. No other device had that much impact on photographic digital printing.
To experiment, I bought a smaller Epson desktop 13″ printer that used Ultrachrome inks (maybe the Epson Stylus Photo R1800). I found out that with glossy paper, there was an issue known as “bronzing”: different colors can have different glossiness, with the result that, under certain viewing conditions, the print will not look uniform but rather will have a patchy appearance. Semi-glossy papers exhibit this problem to a lesser degree. Matte papers do not suffer from bronzing. Since I took up large-format photography with the goal to make large prints, 13″ would not suffice.
I waited for the next generation of wide-format printers from Epson, which was announced in May 2005: the 7800 and 9800. They feature new inks, called Ultrachrome K3. Benefits add up: differential glossiness is much reduced, the output more neutral and linear, blacks considerably improved, the gamut slightly larger, and the print longevity better. As soon as it was available, I bought the Epson 9800 which costs $5,000 and prints 44 inches wide. The extra cost over the 7800 ($3,000) which prints 24 inches wide is easily justified by the possibility to make larger prints and lower paper costs.

The benefits of owning a printer
Those relatively affordable costs were my initial draw to inkjet printers. Prints allow you to scrutinize details, tonal transitions, and composition in a way that digital displays often mask. Seeing your work in print can reveal areas for improvement and elevate your technical and artistic standards. The digital printing process itself teaches valuable skills, such as color management, sharpening techniques, and an understanding of how images translate from screen to paper.
Because of the influence the West Coast photography tradition exerted on me in the 1990s, I felt I was missing something by outsourcing my prints to a LightJet lab. Placing a higher emphasis on the decisive moment and the act of capturing the image, some of the greatest photographers such as Henri Cartier-Bresson and André Kertész delegated the printing of their work to skilled technicians. For those who worked in journalistic or commercial contexts, speed and efficiency were critical. On the other hand, American photography celebrated craftsmanship and individual expression, encouraging photographers to control the entire creative process. Ansel Adams and Edward Weston saw prints as an essential aspect of their artistic expression and taught printing as a key skill. Adams famously referred to the negative as the “score” and the print as the “performance,” emphasizing the artistry of crafting the final image.
For a black-and-white photographer, working in the darkroom is a relatively straightforward decision, since they gain access to powerful possibilities with a fairly simple setup. The chemistry for color is more complex and more toxic. Despite that, the darkroom controls readily available to the color photographer are pale compared to what is possible in monochrome. Using optical processes, it is difficult to alter contrast and tones without provoking unwanted color shifts. The exception is the dye-transfer process, which is extremely time-consuming, expensive, and difficult. The availability of materials for that process is problematic since the few remaining experts rely on stockpiles of discontinued supplies. Preparing images for the Lightjet involved scanning the transparency, making it necessary to color-correct the scan by Photoshop. Once one has tasted the extent of the control on color photographs enabled by digital processing, there is no going back to optical processes. However, even though Calypso would eventually offer their LightJet for $6,000 upon closing in 2010, I did not have a spare large room in the house.
In-house printing capabilities let you have instant and low-cost feedback, and fine-tune prints in a way that would not be practical when you have to re-order prints from a lab. You can make sure that prints are produced to the highest standards. The print settings resulting in the highest print quality consume more ink and time, so in the name of efficiency, a production lab, especially one that often deals with commercial clients, may be tempted to cut corners. Another potential problem is outgassing. To prevent nozzle clogging, slowly evaporating humectant chemicals are incorporate into the inks. When printing coated papers, they are not absorbed by the paper and remain on the print long after it feels dry. As they evaporate over time, they can cause fogging in the inside of the glass when the print is framed. It takes time to cure a print and eliminate outgassing. In the image below, you can see the racks I use to air the prints. The accelerated method is to cover it with absorbent paper which acts like a sponge and draws out the gases from the inks faster than they would escape when exposed to air. The paper becomes wavy as it absorbs the chemicals, and you keep interleaving until the paper is no longer wavy. As a couple days are optimal, some labs may skip this step. When you sell artwork, you are not tempted to drop-ship prints, and instead can naturally inspect and sign the prints by hand.

Operating an Epson wide-format printer
The wide variety of printing media was an unexpected benefit of inkjet printing. Some of those papers mimic the appearance of traditional photographic papers, with a semi-glossy and glossy finish. When viewed by themselves, and especially if framed, the prints could easily be mistaken for silver prints. A side-by-side comparison reveals that they have a flatter look of ink on paper (because it is what they are) than traditional photographs, where the color is embedded within the substrate, giving the image more depth. However, in terms of resolution and color gamut, not to mention print longevity, they easily exceed Lightjet prints. Unique to the inkjet process is the possibility of using matte papers with equal sharpness and color gamut. The total absence of reflections in a print of that quality was not achievable by silver printing processes. When combined with textured or heavy-weight fine-art papers, prints of distinctive and refined appearance are possible. Inkjet printers are also equally comfortable with non-paper media such as canvas. They encourage experimentation with different media, adding layers of creativity.
One of the reasons inkjet printers are so affordable for what you get is that much of the manufacturer’s profit results from sales of consumables, especially inks. I have spent well over $20,000 in ink alone. In 2024, a 220ml cartridge for the 9800 has a market price of $130, which is 60 cents per ml, or $2271/gallon, which is much more cost-effective than the cartridges used in desktop printers, but still a damm expensive liquid. More recent Epson printers use even larger cartridges. However, you would need to print a lot, since Epson says their ink should not be allowed to stay in a printer beyond six months of first inserting. It takes about 1.3ml to print a square foot. With standard photo papers such as Lexjet Sunset Photo eSatin, which I prefer over Epson Premium Luster because of its heavier weight which makes it less fragile, paper costs are close to ink costs, resulting in a cost of about $1.5 per square foot. By comparison, the material costs for a LighJet print are less than $0.5 per square foot. However, labs charge around $10 per square foot. Although relatively high, the cost of inkjet consumables is much less than the cost of ordering a print from a lab, which in the long run makes the printer pay for itself if you print enough. It is no coincidence that labs such as Calypso and West Coast Imaging are now closed.
In retrospect, I could have seriously investigated refillable cartridges with third-party inks. Epson sells only one-time-use cartridges. I have discarded well over two hundred of them. They cannot be recycled. Inkjet printing pioneer Jon Cone estimates that Americans throw away more than 450 million ink cartridges yearly and that many still contain valuable ink. Cartridges come with a chip that tells the printer how much ink remains. However, the chip cannot measure the ink level and instead attempts to track the amount of ink used, often overestimating it by about 20%, a fact that had been established in a class-action lawsuit. Besides avoiding the waste of cartridges and ink, third-party inks represent a significant savings over original equipment manufacturer’s inks. Cone claims that his inks have longer in-printer life than Epson’s and are less prone to clogging. The downside is the risk that those inks do not measure up to the OEM inks in terms of print quality or longevity, as assessed for instance by the independent
AaI&A. When the main function of the printer is to produce artwork for sale, the differences in ink costs aren’t that significant. I did not feel comfortable to use anything but the best, even though it came at an environmental cost. For black and white printing, the calculus is entirely different, since Cone’s
Piezography system, which replaces all the OEM inks with 6 to 10 shades of carbon-based greys, has been proven to the highest standard in digital photographic black and white printing. The three black inks (K3) of Ultrachrome K3 already result in excellent black and white prints. If only I had space for another printer…

Epson issues
Epson printers use two different black inks, each one optimized for coated (glossy and semi-glossy) papers or matte papers. The catch is that only one of the two ink cartridges can be inserted on the 9800. Switching between them is more involved than just swapping ink cartridges. You need to purge and flush the old ink from the lines and charge the lines with the new black ink. As the ink lines contain 15ml per ink channel, this process consumes a substantial amount of black ink of both types (some color ink too) and fills up the non-reusable maintenance tank. It also takes time and could potentially affect the printer’s reliability.
Unlike the smaller desktop printers, wide-format printers are truly production-grade and built to last. Over the years, my 9800 has proved extremely reliable. The print quality has remained remarkably consistent. The printer works as well as it did on day one, with one important exception. It reports that since 2005, it ran nearly 48 liters of ink and 1943 meters of paper. The issue is that a lot of this expensive ink was wasted. With normal operation, 30% of inks end in the waste pad or maintenance tank. Then, there is the issue that over the years, the nozzles get more frequently clogged. If you print with clogged nozzles, the print quality can suffer significantly. Therefore, it is necessary to make sure they are clear before making a print. The 9800 does so by printing a test pattern and scanning it to verify it is correctly printed. If the printing is not satisfactory, indicating a clogged nozzle, the printer starts a cleaning cycle during which it forces ink through the nozzles at high pressure to clear blockages. The printer repeats those two actions automatically until the nozzles are clean, or up to five times. For the past few years, I sometimes had to repeat up to ten automatic cycles, which means fifty cleaning cycles. On average, an automatic cycle wastes about 25ml of ink. It just takes seven such cycles to waste $100 in ink, which always puts me in a sour mood.
Because the 9800 has developed that issue, one may think that the solution may be to replace it with a newer Epson printer. Considering not just print quality, but also reliability, Epson’s apex may have occurred in 2007, with the 7880/9880 differing from the 7800/9800 only by improved placement of the dots and a more vivid Magenta ink enhancing the gamut. Those discontinued printers are not easy to find, as their owners are hanging onto them. Major changes happened in 2008 with the 7900 and 9900 printers. A much welcome improvement was the ability to carry simultaneously a black ink suitable for printing on glossy paper and a black ink for printing on matte paper. Two additional inks, orange and green, helped expand the color gamut. However, while the new TFP print head improved the printer’s speed, it has become notorious for head clogs, maybe because the new nozzle spacing has become too tight. The 7890 and 9890 are essentially just 7900 and 9900 without the orange and green channels. The Epson P6000, P7000, P8000, P9000 share the same print head and therefore the same problems. Although with the 9800, automatic cycles waste a considerable amount of ink, I can run them until the nozzles are clear, which so far has never failed to happen. With the newer printers, Epson recommends you run no more than a couple of consecutive cycles, as doing more could damage the fragile print head. If after that, the head is still clogged, then you need to wait a day before the next attempt. Many users report no progress with the print head cleaning cycles. They have to manually clean parts such as the capping station, flushing box, or print head. Besides the final solution, the only remedy then is to flush out all the inks and install cartridges filled with a cleaning fluid to flush the print head. If a printer is to sit idle for more than a few weeks, this procedure should be done preventively.

Printing for one’s sake
Some measures help mitigate clogging. Removing the cartridges and shaking them weekly help the inks stay in suspension. Keeping the relative humidity in the 40%-60% range with a humidifier slows the drying of inks. But by far, the main thing is to use the printer regularly. My 9800 had become prone to clogging not because of its age, but my diminished use. In the late 2000s, I fulfilled almost 300 orders yearly, often comprising multiple prints. That number has dropped significantly. As a result, the printer sits idle for several weeks. Those “pro” printers are designed for a production environment. They effortlessly support intense use, but do poorly with light use.
I had installed the 9800 for business reasons and rarely printed for myself. Over the years, it has printed over $900,000 worth of artwork. As its frequency of use declined, I could either waste inks in cleaning cycles or use them more productively by making prints for my personal use. It is an easy choice. Instead of large prints for display, I make portfolio-sized prints, smaller than any I offer for sale. I try to activate the printer daily by printing at least two images on letter-size paper before performing a manual nozzle check. So far this is enough to keep the nozzles mostly clean. Whenever the nozzle check misses a few segments, just by printing, the nozzles often fix themselves. For work prints, I have always used scraps of roll paper, including the final part of the roll which suffers from excessive curling. However, for my portfolio prints, which end up in the hand rather than on the wall, I am indulging in fine-art papers although the cost is three times my standard paper in rolls. Their weight heightens the tactile feel of the paper, while their texture interacts with the light. The prints are stiff enough to be displayed on a shelf by itself. After trying quite a few, my favorite is Canson’s Platine Infinity Fibre Rag.
This new daily routine gives me great pleasure. I started it as a way to maintain my 9800, but this could have been done with an inexpensive 8 inch printer. Creating a print completes the photographic process, offering a sense of closure. A print transforms a digital file into a tangible object, offering a sensory experience that deepens your connection to the image. A print on quality materials without acid and wood pulp endures beyond our lifetimes, preserving your creations for future generations. In an age dominated by screens, making prints honors photography’s rich history and roots as a physical medium, reinforcing its value as an art form.